
You can get all the campaign performance from the Google Ads dashboard. But some metrics are not navigable, such as click-through rate, impressions share by campaign, conversion rate, and ROAS. Every time you want to analyse the metric, you open the dashboard and navigate to the section. Sometimes you may miss this data.
Smart teams analyse and optimise Google Ads performance by asking a few questions every day: which campaigns spend the most but convert the least, where CTR or conversion rate has dropped, which search terms waste budget, and which campaigns have the best ROAS. Automation lets you get those answers in seconds instead of digging through the dashboard. Below, we show how to set this up with the Google Ads MCP server.
Now you can do Google Ads automation via MCP (Model Context Protocol). Instead of pointing or clicking through the dashboard, you can ask about your ad performance, and it will reply to you in plain language through Google Cloud CLI connected to Gemini and pulling your ad data from your account.
You implement this in other platforms like Cursor, Claude, and other AI platforms that provide MCP access. Here we explain Google Cloud CLI and Gemini. From this blog, you can learn how to run a Google Ads performance query against real campaign data.
https://github.com/googleads/google-ads-mcp. This is the MCP server repo from Google. Now we are going to integrate our ad account with this MCP server. No need to write code. You can use their pre-written MCP server tools to set up Google Ads automation.
What you need before starting
You need some prerequisites before building the Google Ads automation system
Google Ads account (MCC account/single user account)
A Google Cloud project
Python 3.10+ version
Gemini installed
Google Cloud CLI
Creating a Google Cloud project and downloading credentials
Firstly, we need to create a Google Cloud project and then create an OAuth app type ‘desktop,’ then create an OAuth client, and download the credentials file. This step is very important for the Google Ads automation through API. Let’s go.
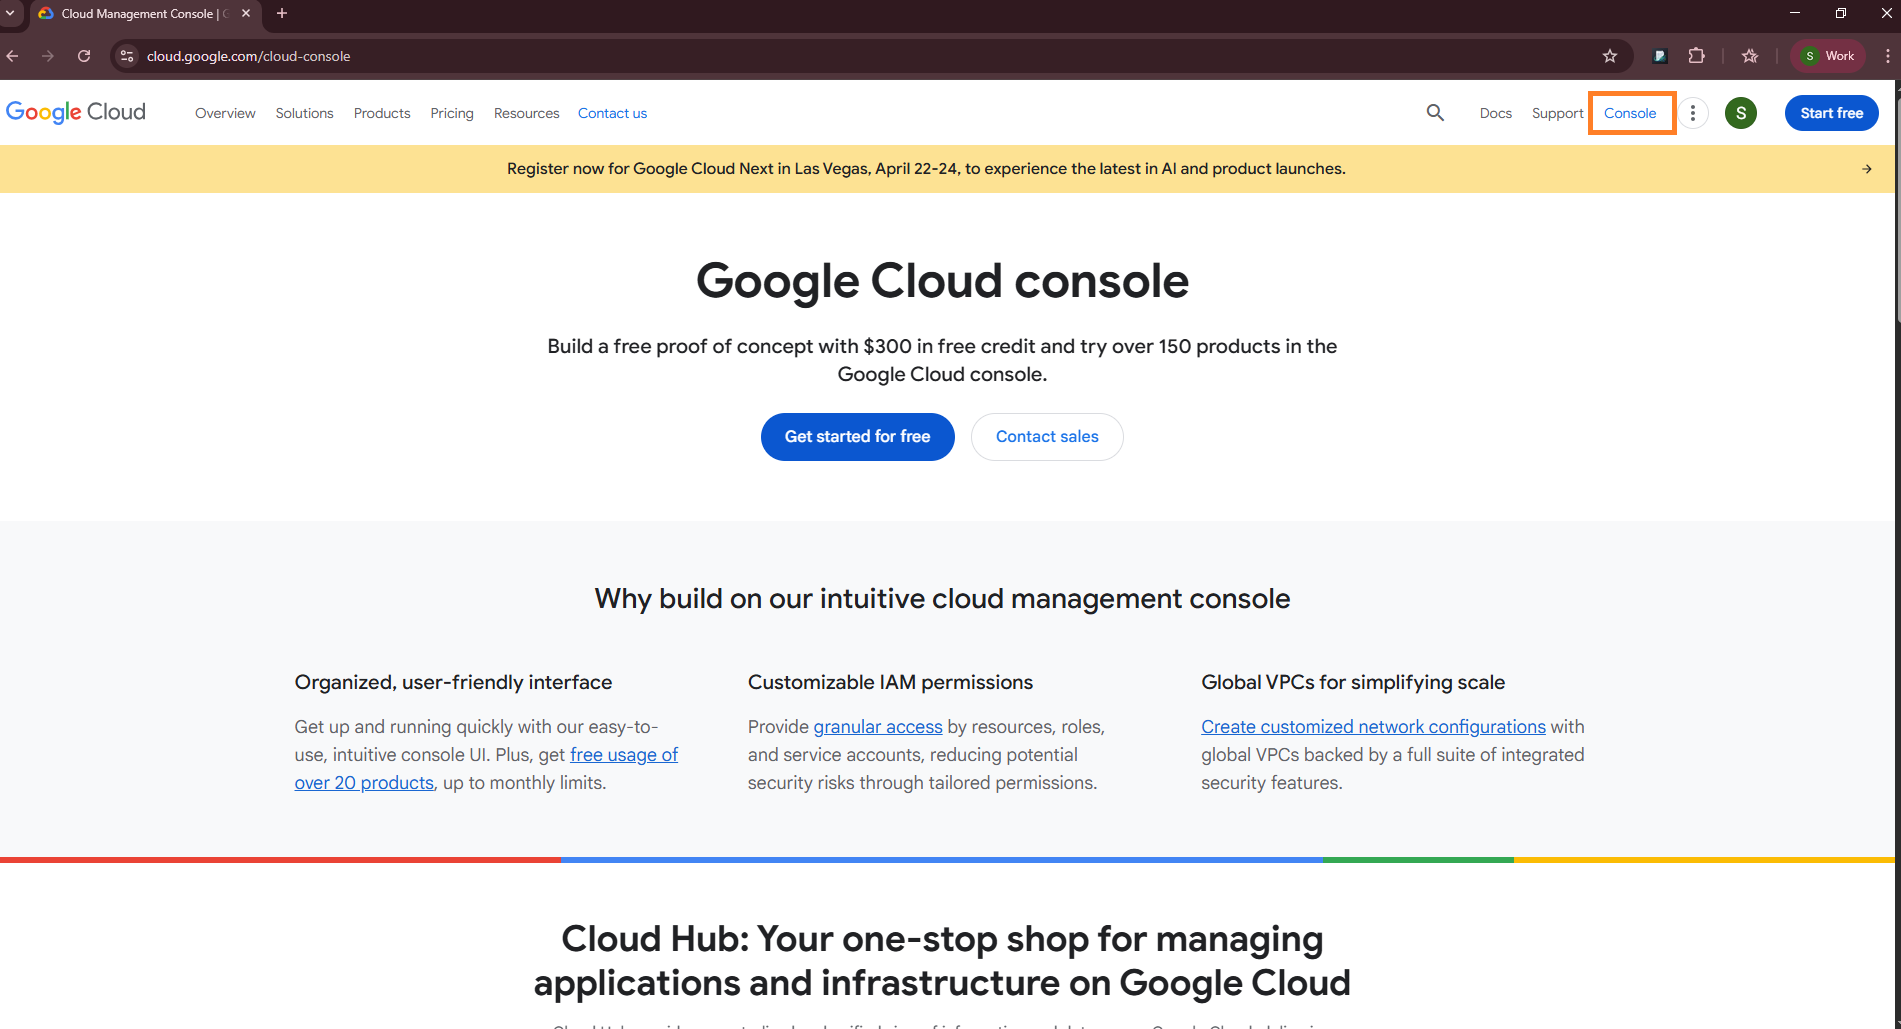
Step 1: Open Google Cloud Console (https://cloud.google.com/) in your browser. Just open Google Cloud Console sign in with your mail ID and click ‘Console.’
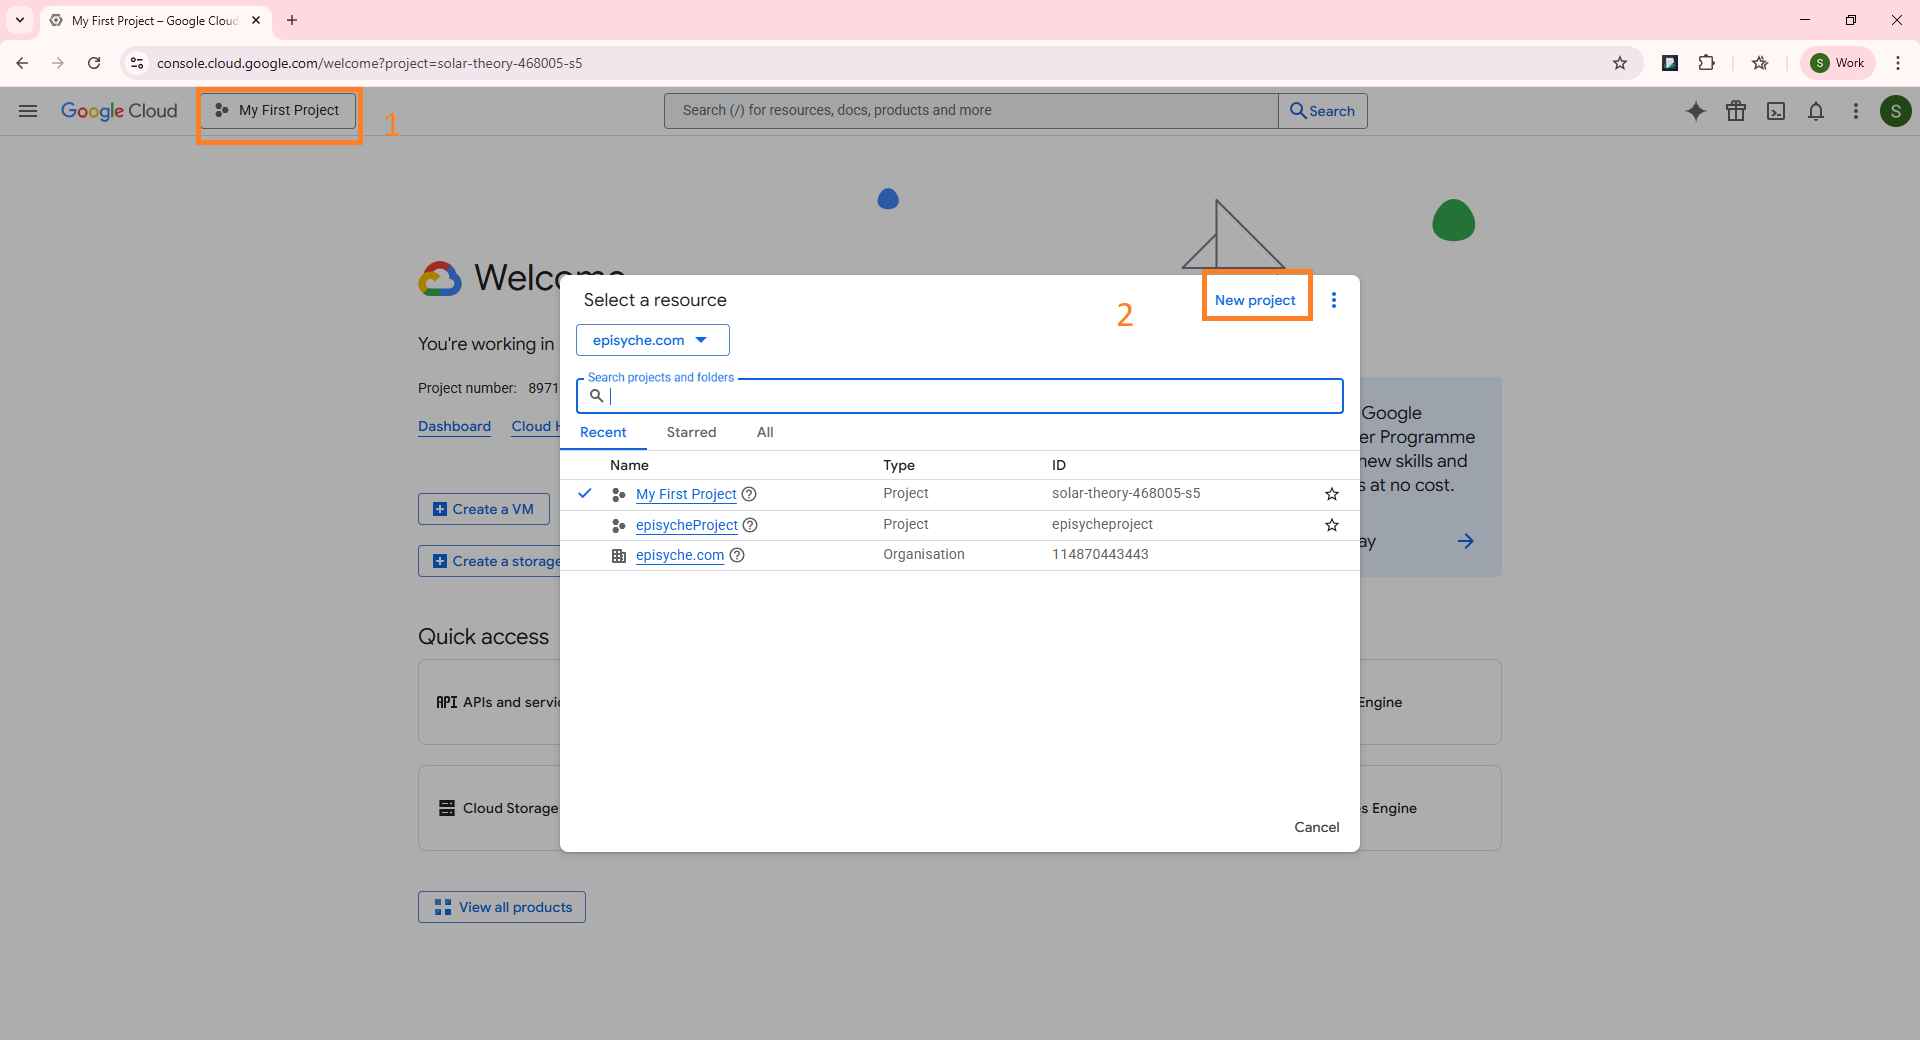
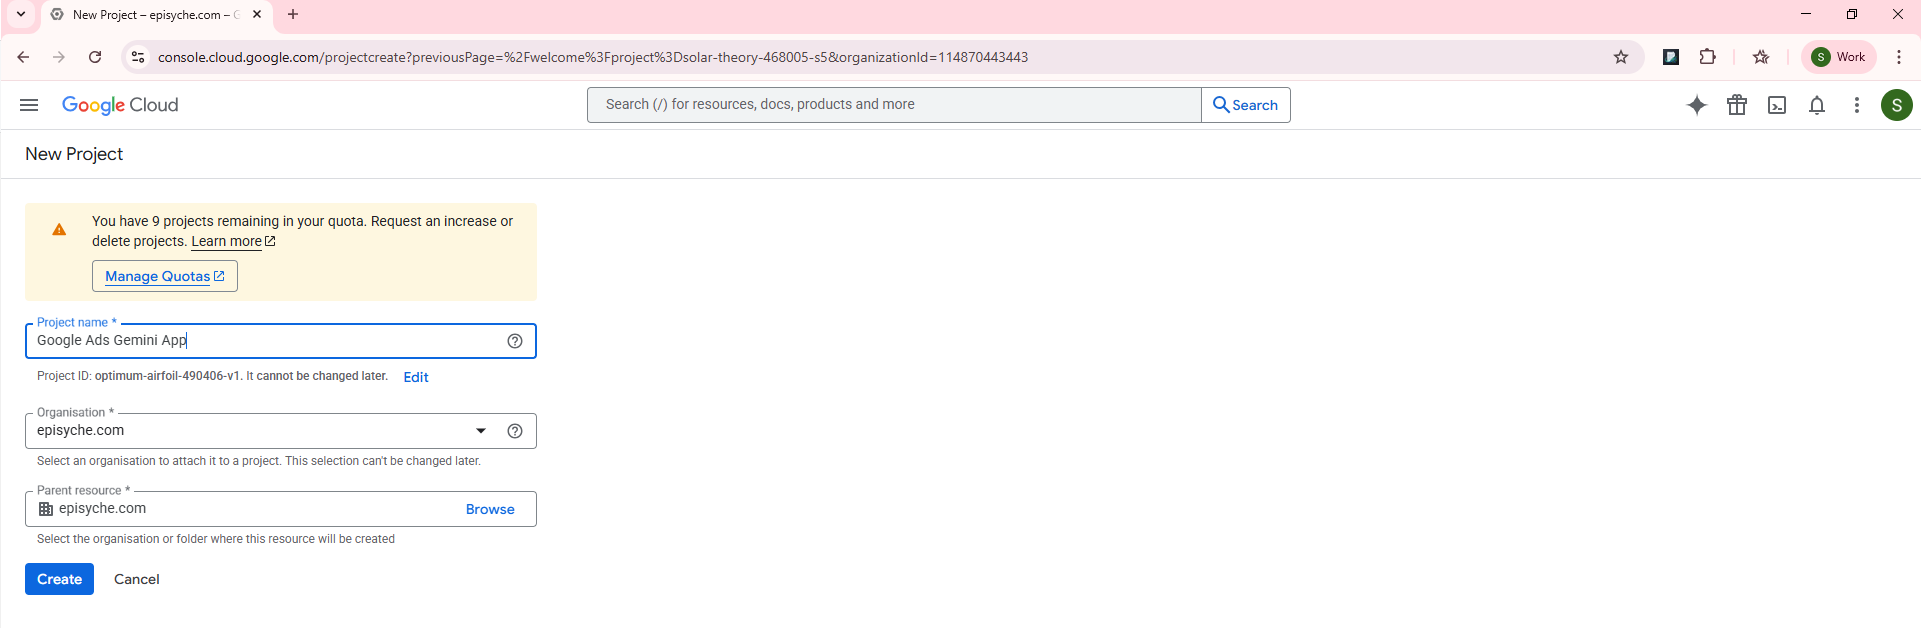
Step 2: Create a new project in Google Cloud
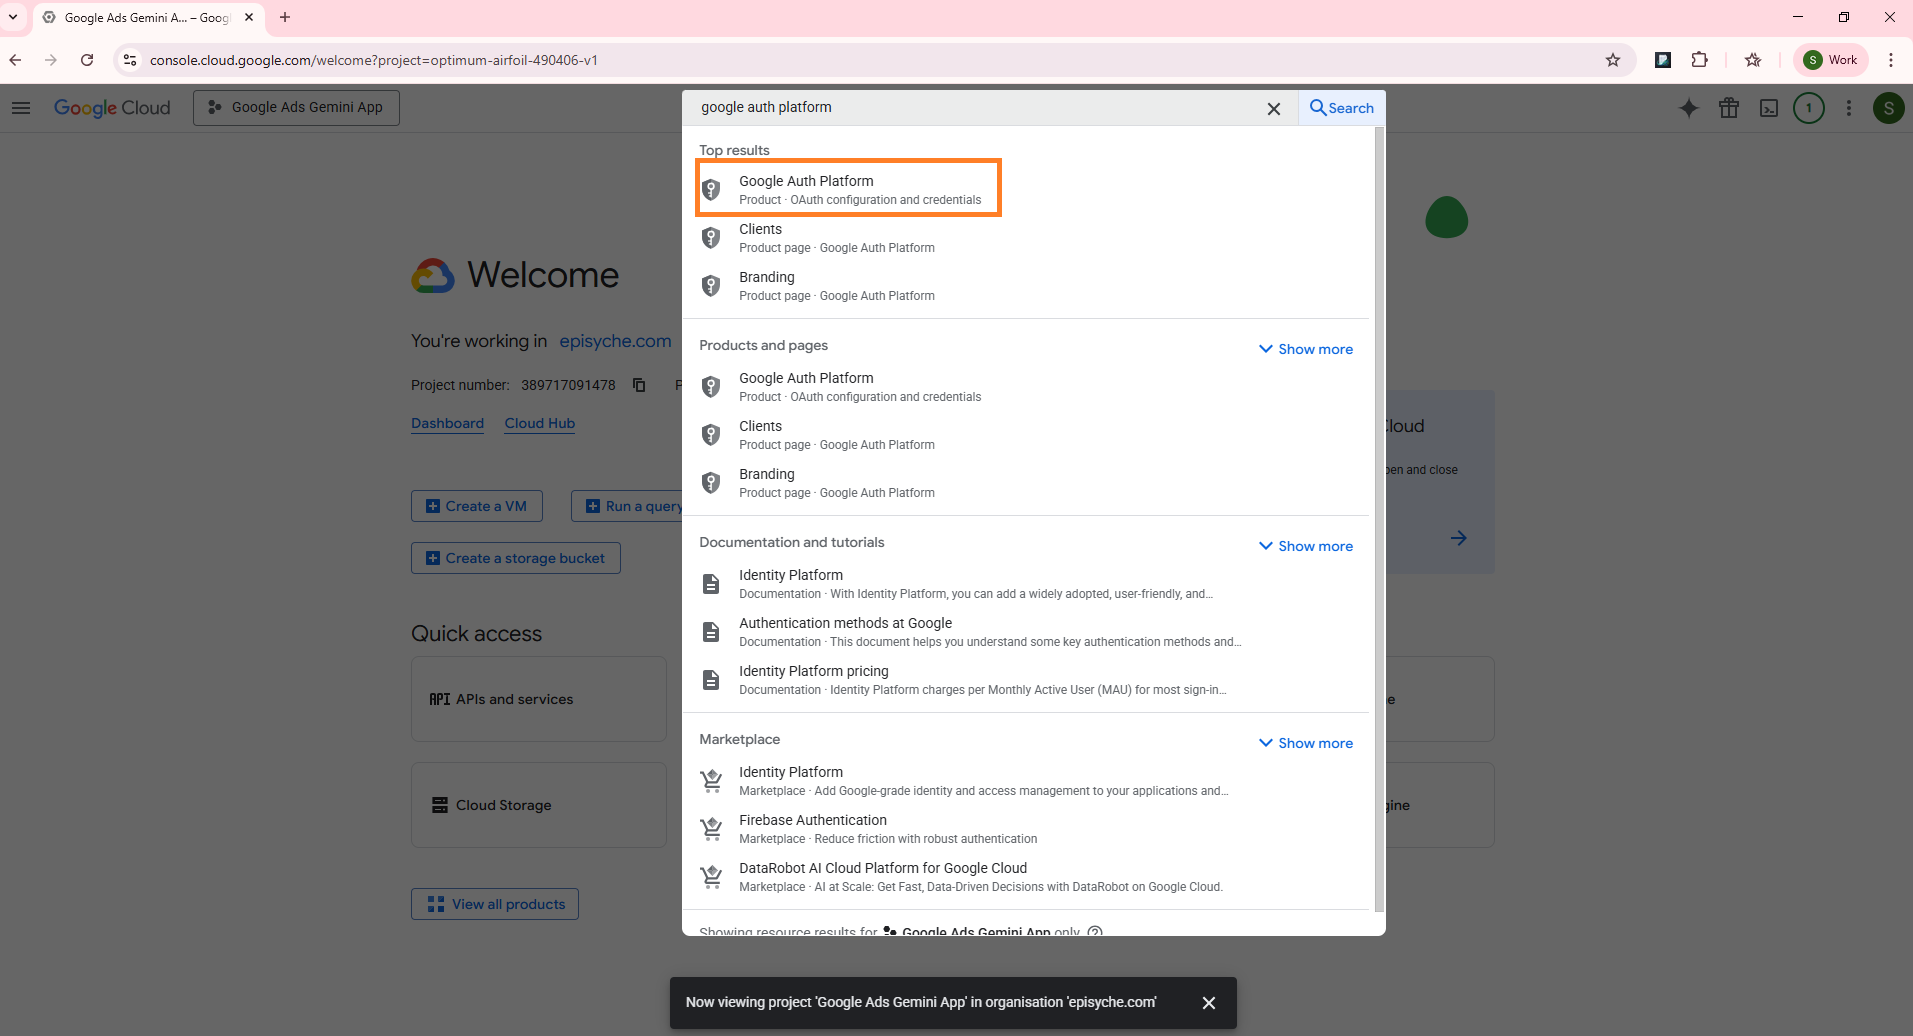
Step 3: Search for ‘Google Auth Platform’ and open it.
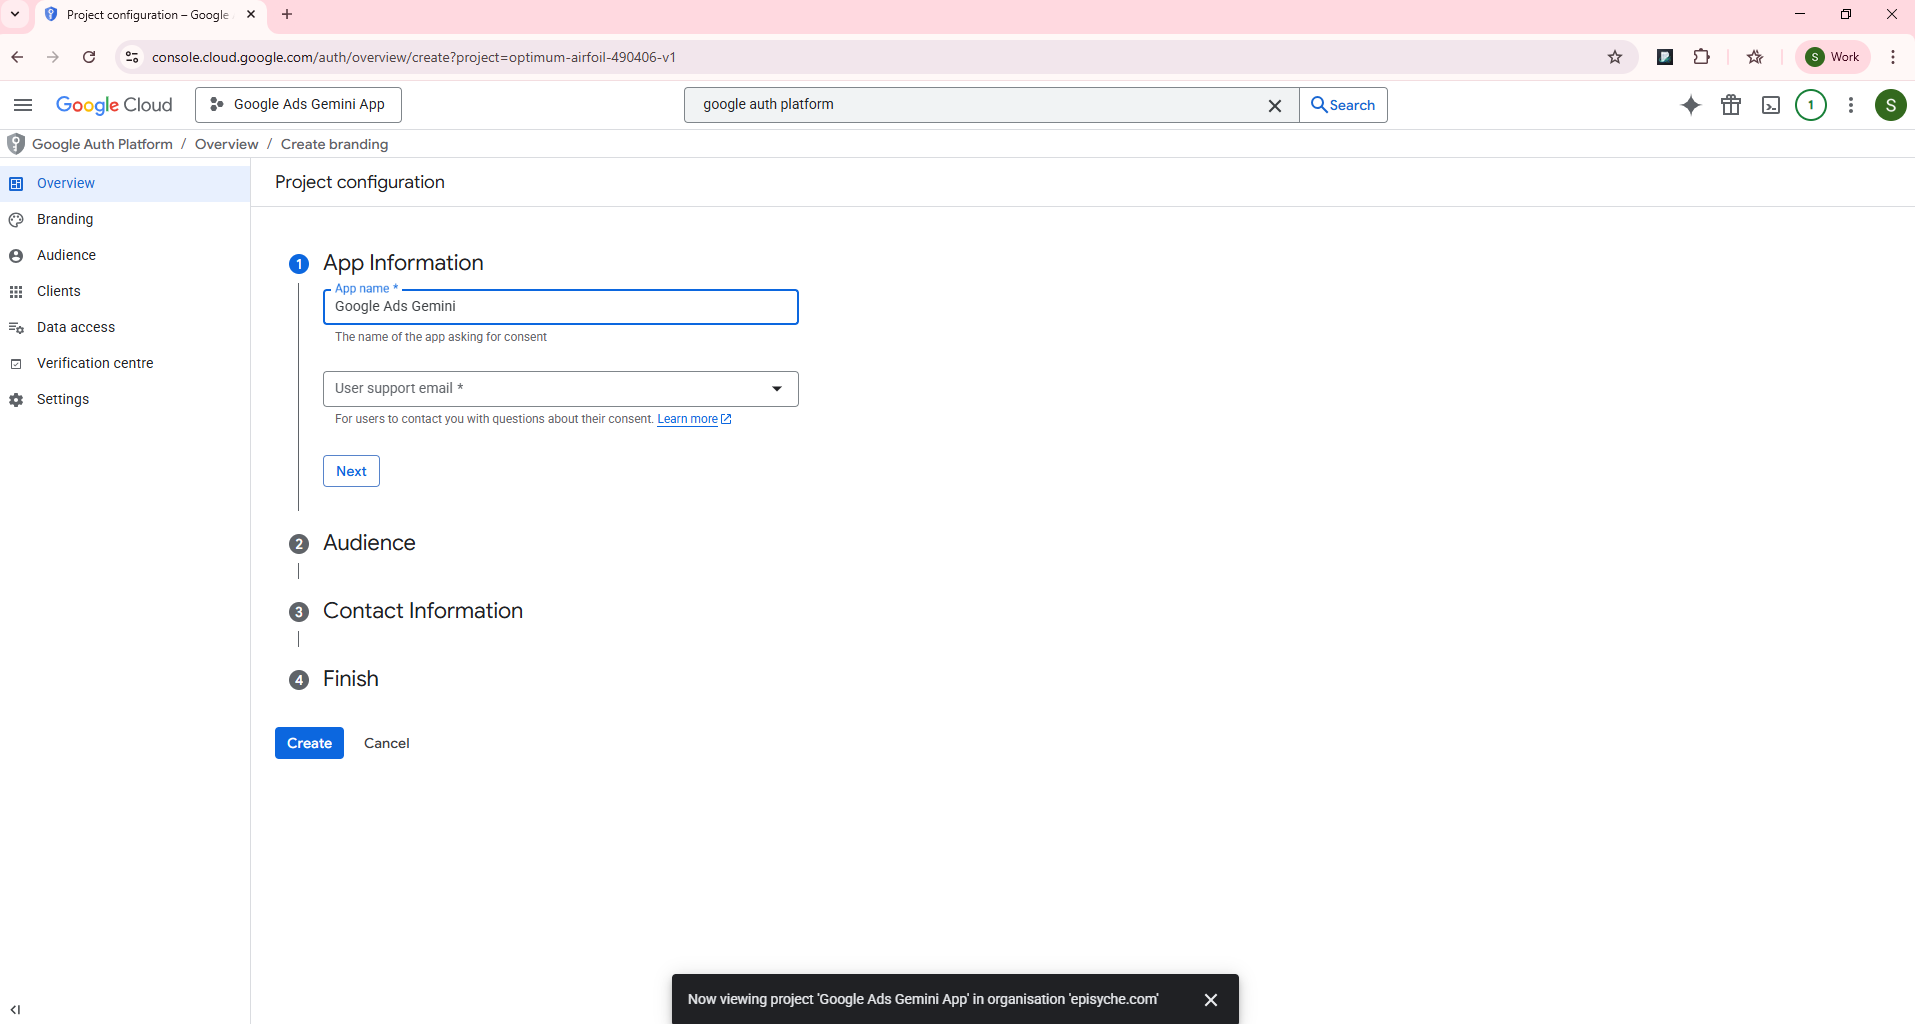
Step 4: Complete the project configurations
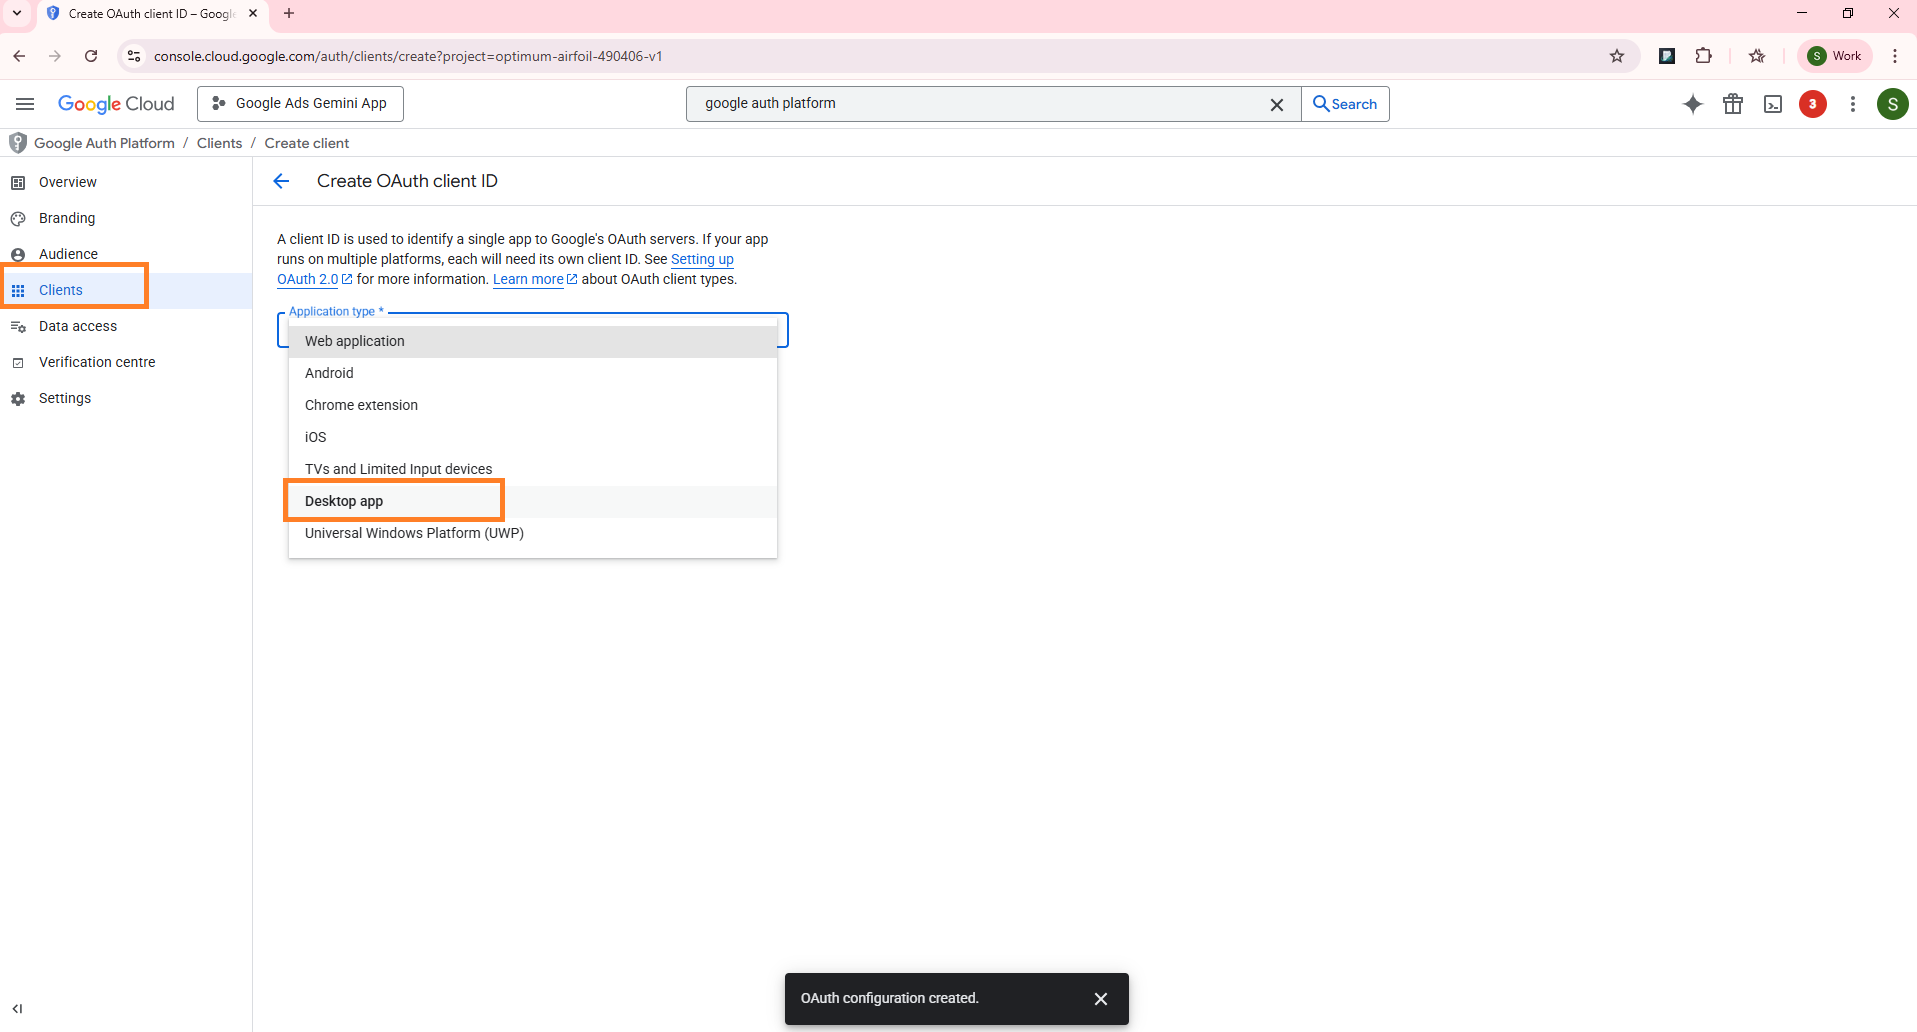
Step 5: Then click ‘Clients,’ then click ‘create client.’ Choose application type as ‘desktop.’
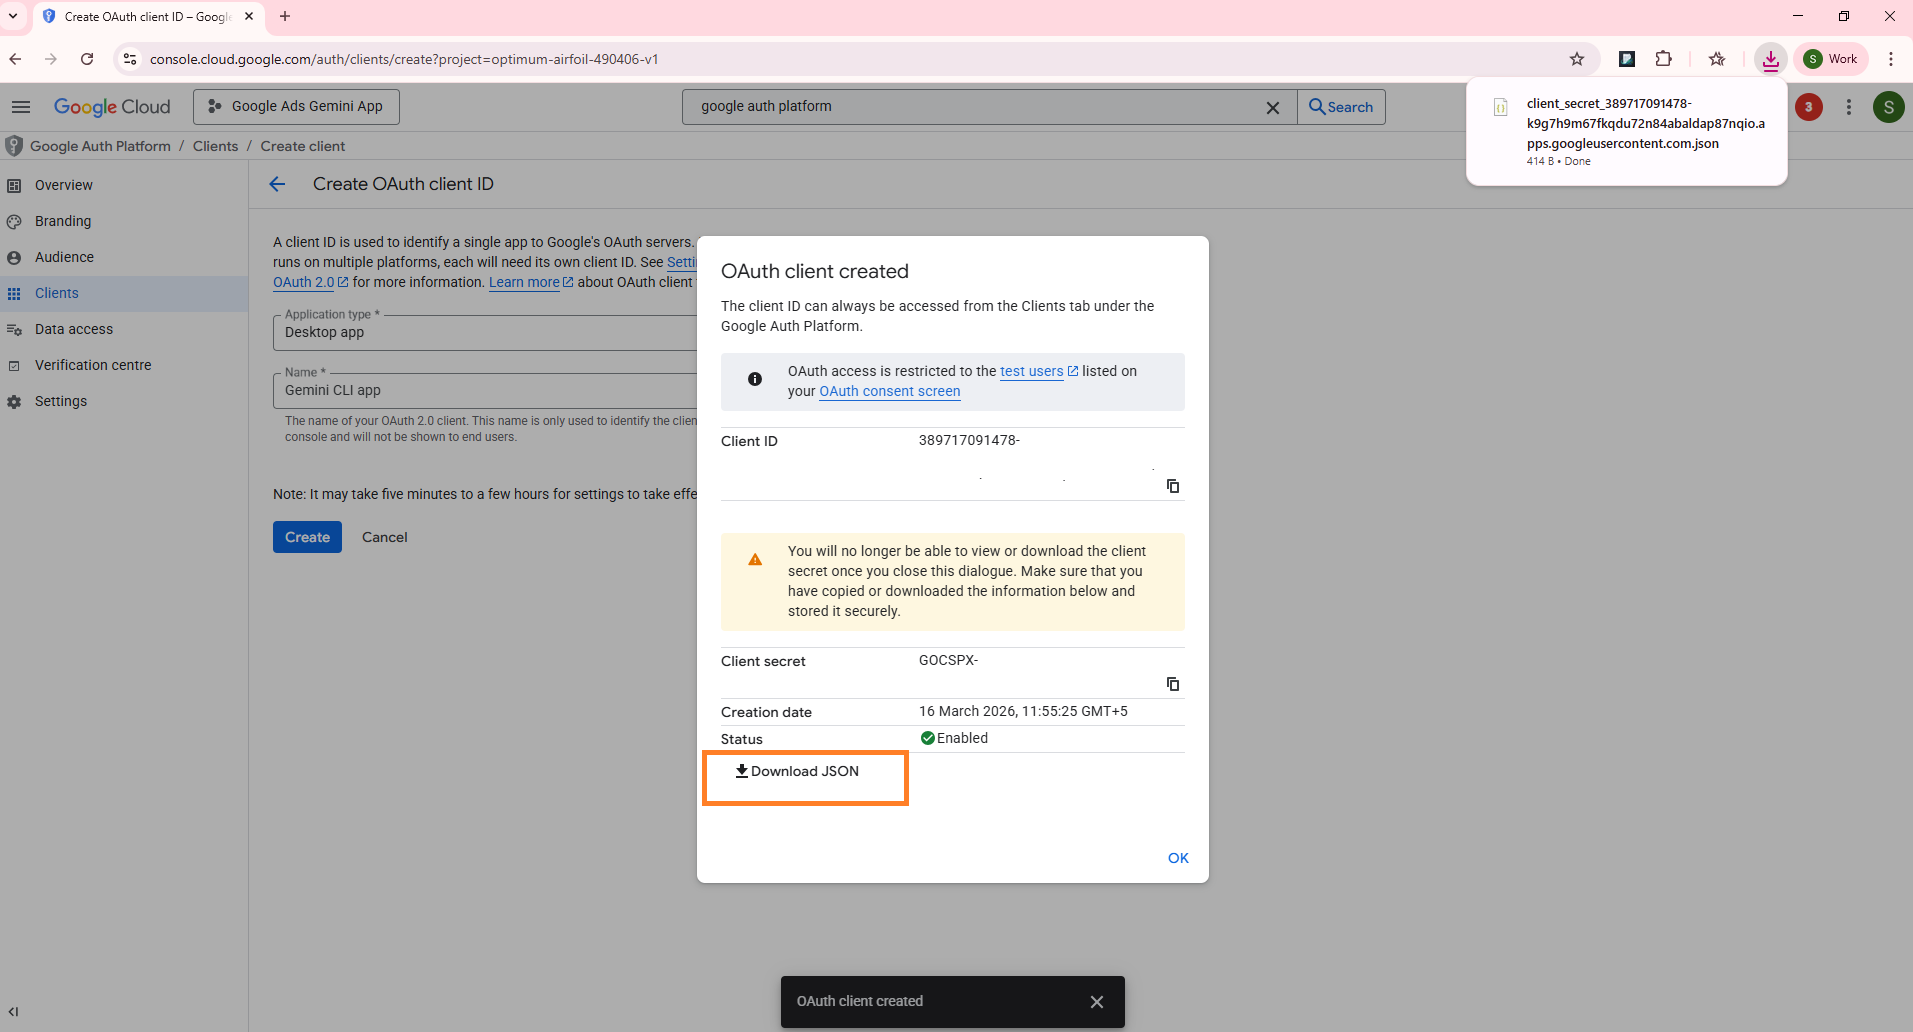
Step 6: Then, create a desktop app name and click ‘Create.’ Your client ID and secret will be created. Download the credentials JSON file for later use.
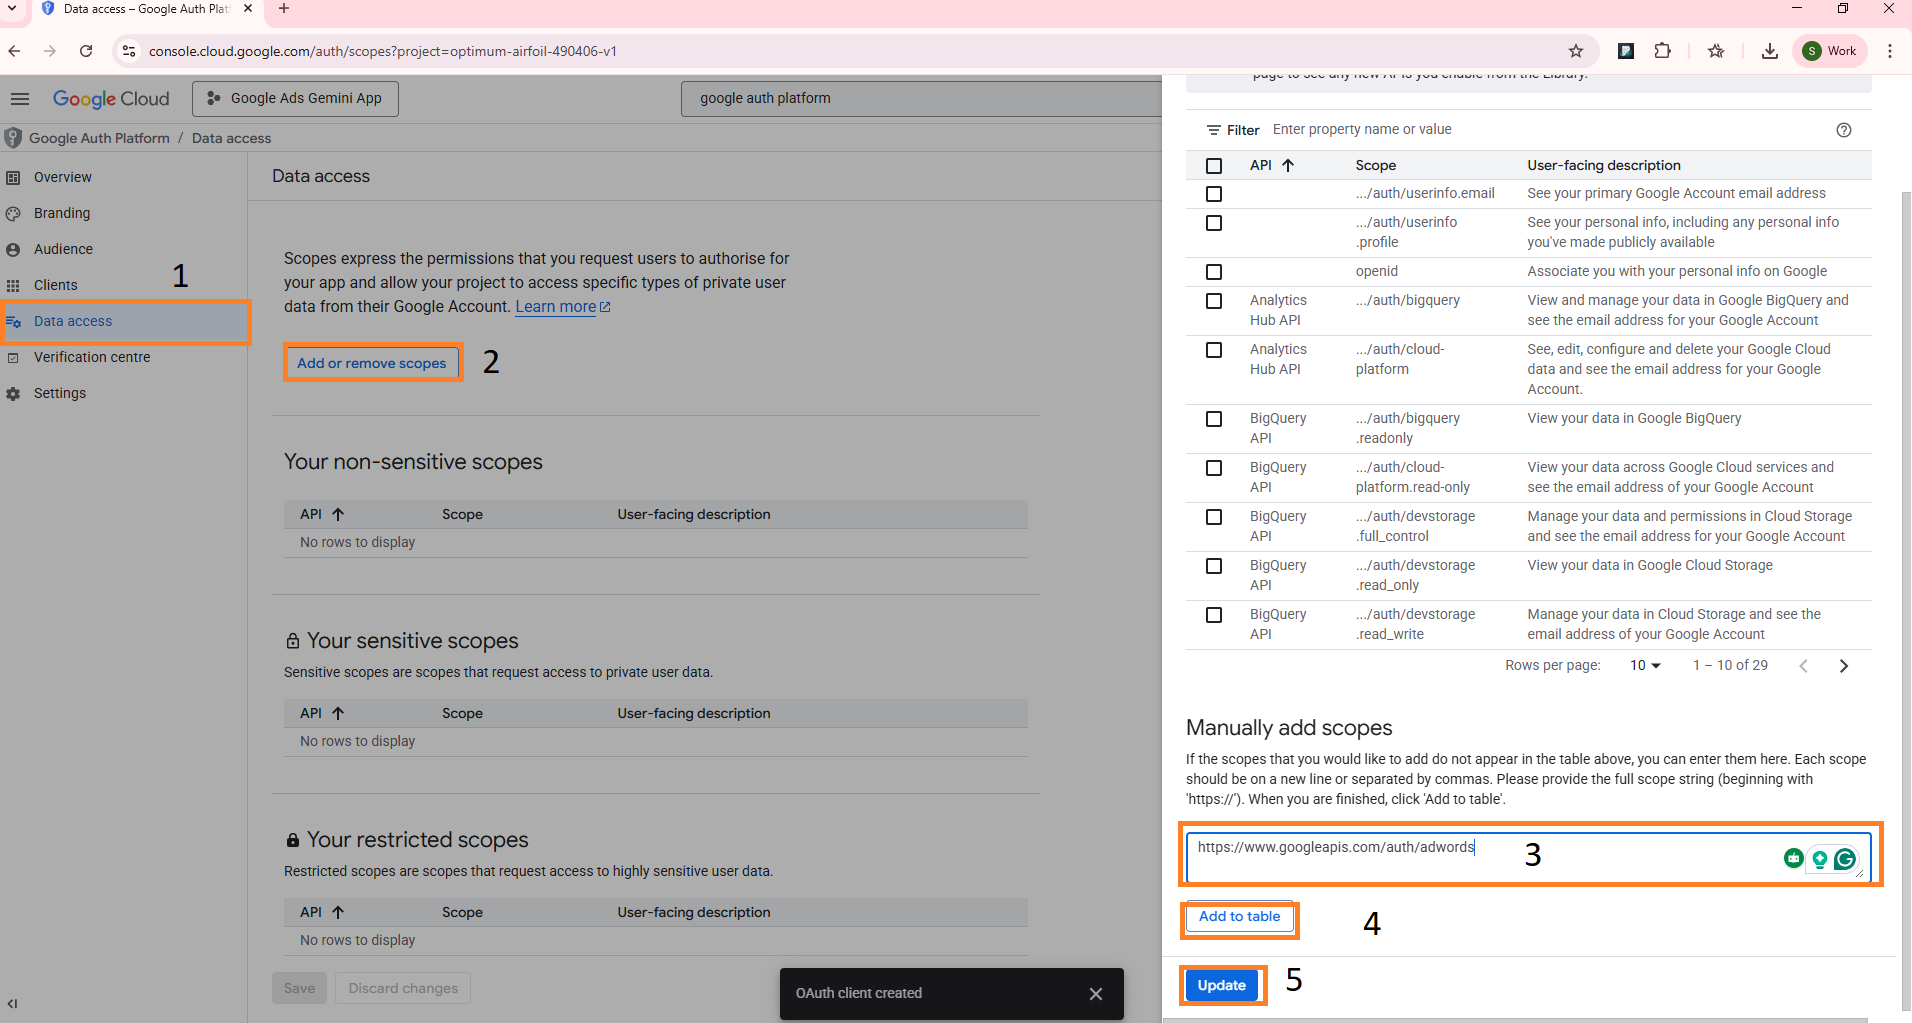
Step 7: Add the scope ‘https://www.googleapis.com/auth/adwords’ to the app. This step is important. Because it gives the basic permission level to the CLI.
Step 8: Enable ‘Google Ads API.’ This is the final step. Search for ‘APIs and Services,’ then click ‘Enabled APIs and Services.’ And again search for ‘Google Ads API’ in the search bar, then enable it.
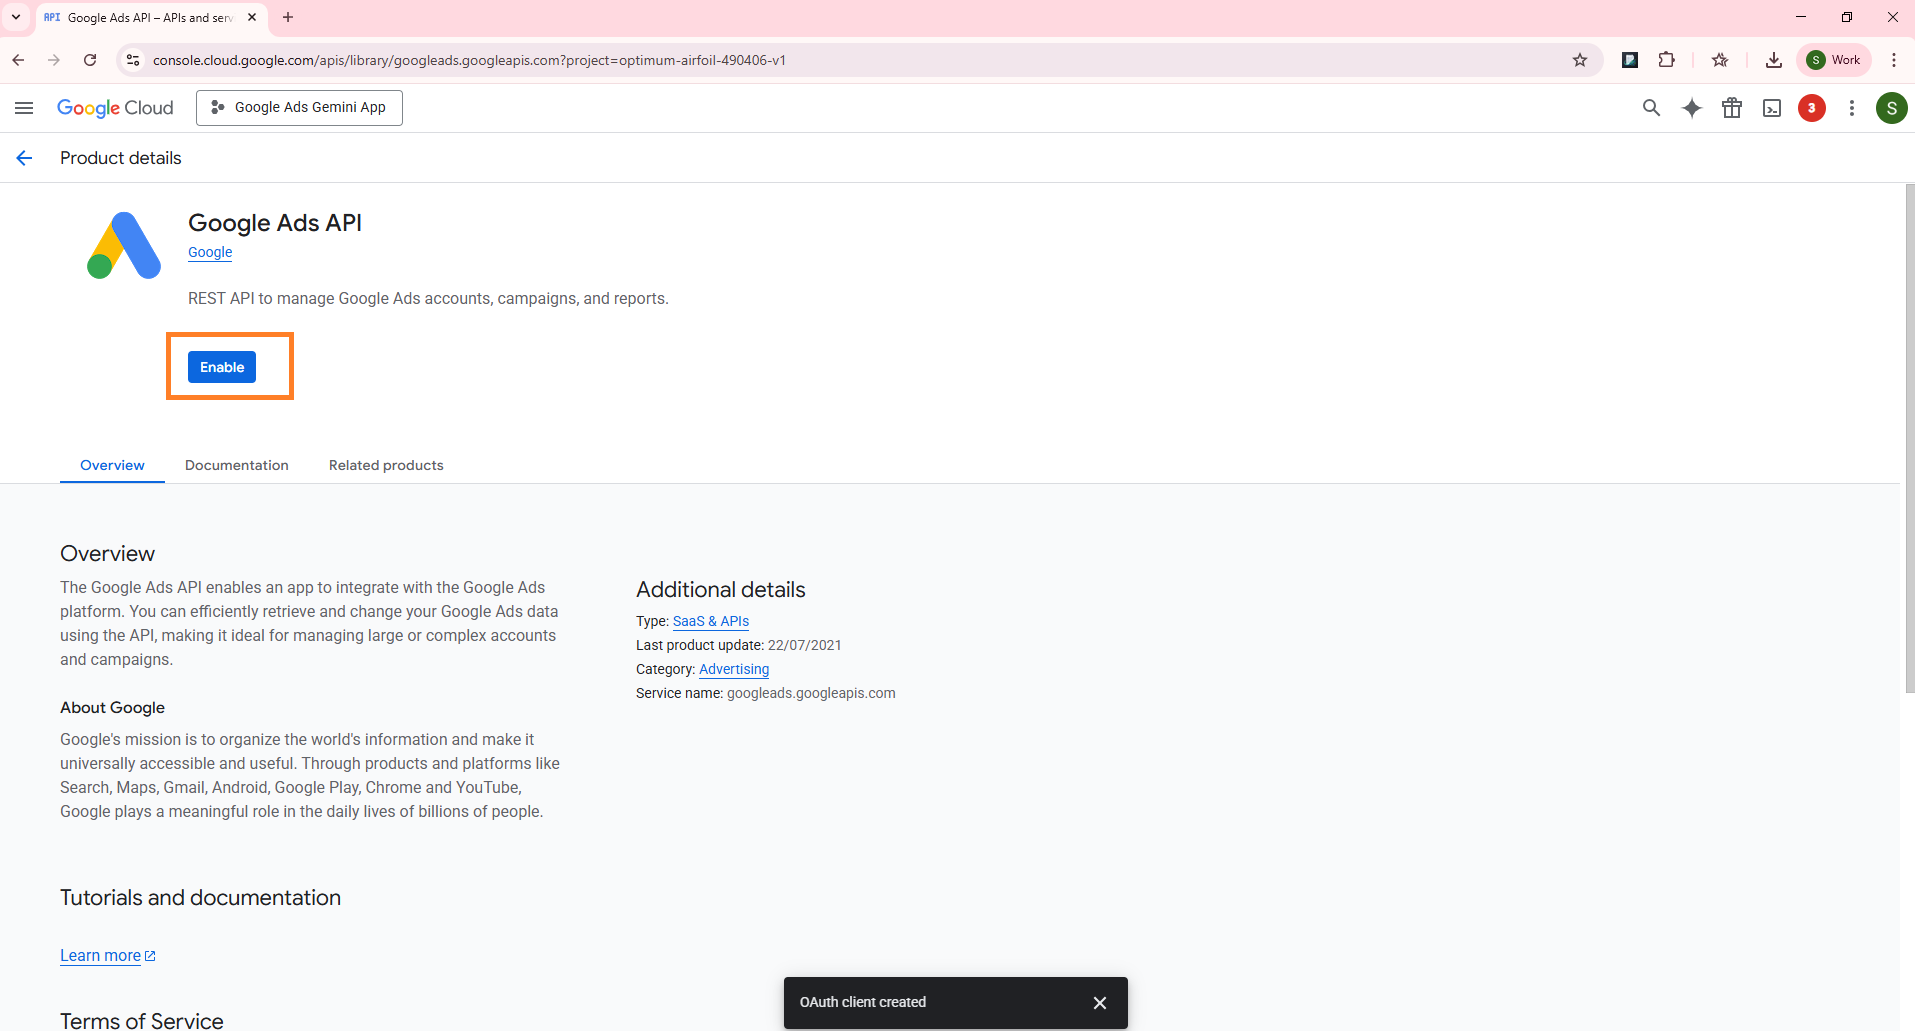
Finally, we created a Google Cloud project, enabled the API, and added scopes. It is the basic step for your Google Ads automation.
Verify Python version and install pipx
Verify the Python version from cmd. You need Python 3.10+ for this
python --versionThen install pipx, and after installation, ensure its path. Install it in the home directory where your Python package exists.
pip install pipx
pipx ensurepath
Get Google Ads developer token
Open your Google Ads account dashboard using the following link https://ads.google.com and navigate to the API Centre which will be under the tools section. Here you can copy the developer token. There are two types of developer tokens available.
Test developer token which can be used right away without any approvals.
To produce a developer token for this, you need to submit an approval to Google and it takes at least 48 hours to get approved.
a) To get the production developer token, please follow this instruction guide https://developers.google.com/google-ads/api/docs/api-policy/developer-token.
b) Please copy the token, manager account ID (optional), customer ID, and store it somewhere for quick reference.
For Google Ads automation, this developer token is mandatory. You have to fetch this developer token in the same account in which you get client credentials.
Google Ads automation: Fetch data from the account through the MCP server by connecting Google Cloud CLI and Gemini.
Step 1: Download and install Google Cloud CLI
Follow these instructions https://cloud.google.com/sdk/docs/install to download and install Google Cloud CLI.
Enable these options during installation
✔ Add gcloud to PATH
✔ Install required components
After installation, restart or close and reopen the terminal and verify its version with gcloud --version.
Step 2: Install Gemini CLI
For Windows, I have used NPM to install the Gemini CLI. For other platforms, please refer to this link https://geminicli.com/docs/get-started/installation/ for the installation guide.
npm install -g @google/gemini-cliStep 3: Set up Application Default Credentials (ADC) and an OAuth desktop app with the client JSON we’ve already downloaded from Google Cloud.
Open CMD and paste this.
gcloud auth application-default login \
  --scopes https://www.googleapis.com/auth/adwords,https://www.googleapis.com/auth/cloud-platform \
  --client-id-file=**YOUR_CLIENT_JSON_FILE**
Just replace your client JSON file path from your local system.
If you’re already using a service account, then you can use this.
gcloud auth application-default login \
  --impersonate-service-account=**SERVICE_ACCOUNT_EMAIL** \
  --scopes=https://www.googleapis.com/auth/adwords,https://www.googleapis.com/auth/cloud-platform
Replace the email ID generated after creating the service account in Google Cloud.
This redirects you to the consent screen. You should allow gcloud to read your Google Ads data. This is the most important authorization step to fetch data. After this, it will show the file path where your credentials are saved. Copy the credential file path for later use.
Step 4: Configure credentials for the Gemini CLI
After authenticating the Gemini CLI, we need to create or open the ‘settings.json’ file inside the Gemini folder. Just add the code like below.
{
  "mcpServers": {
    "google-ads-mcp": {
      "command": "pipx",
      "args": [
        "run",
        "--spec",
        "git+https://github.com/googleads/google-ads-mcp.git",
        "google-ads-mcp"
      ],
      "env": {
        "GOOGLE_APPLICATION_CREDENTIALS": "PATH_TO_CREDENTIALS_JSON",
        "GOOGLE_PROJECT_ID": "YOUR_PROJECT_ID",
        "GOOGLE_ADS_DEVELOPER_TOKEN": "YOUR_DEVELOPER_TOKEN"
      }
    }
  }
}
Replace your PATH_TO_CREDENTIALS_JSON with the path we get after gcloud authentication. And replace the project ID from Google Cloud and the developer token from Google Ads.
If you have a manager account (MCC) in your Google Ads. Then you can use this.
{
  "mcpServers": {
    "google-ads-mcp": {
      "command": "pipx",
      "args": [
        "run",
        "--spec",
        "git+https://github.com/googleads/google-ads-mcp.git",
        "google-ads-mcp"
      ],
      "env": {
        "GOOGLE_APPLICATION_CREDENTIALS": "PATH_TO_CREDENTIALS_JSON",
        "GOOGLE_PROJECT_ID": "YOUR_PROJECT_ID",
        "GOOGLE_ADS_DEVELOPER_TOKEN": "YOUR_DEVELOPER_TOKEN",
        "GOOGLE_ADS_LOGIN_CUSTOMER_ID": "YOUR_MANAGER_CUSTOMER_ID"
      }
    }
  }
}
Replace your manager account ID in YOUR_MANAGER_CUSTOMER_ID and without a hyphen like 878879898.
Step 5: Launch Gemini CLI
Then launch Gemini in CMD
C:/Users/YOUR_NAME>geminiIt launches, and types ‘/mcp,’ and it will show you the available connected MCP servers
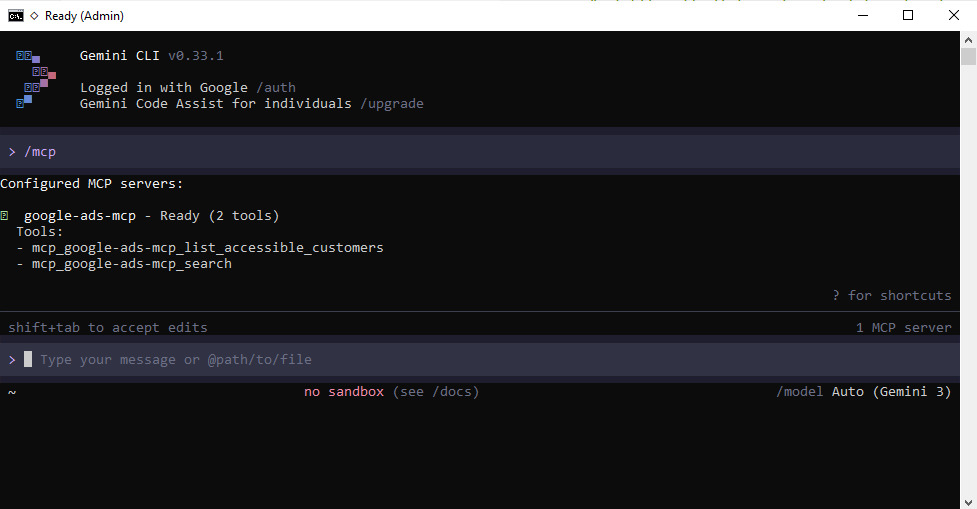
If it still stays ‘Starting…’ for a few minutes instead of listing tools. Then run the command below to sort the problem.
pipx run --spec git+https://github.com/googleads/google-ads-mcp.git google-ads-mcpRun this manually; this will preinstall the server. After that, restart CMD or the terminal. If there’s any error in .env, then no problem. And then type ‘gemini’ and ‘/mcp.’
Step 6: Ask a question
Allow permissions based on your own. Here, I chose ‘Allow all server tools for this session.’ For the entire session, you enable permission for all tools.
User question is: What Google Ads accounts do I have access to?
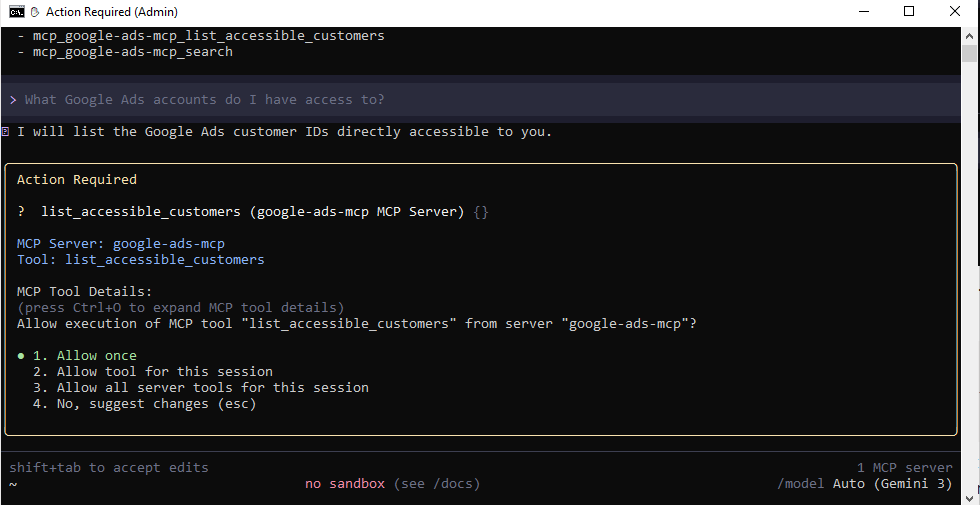
I got an answer from Gemini CLI through the MCP server.
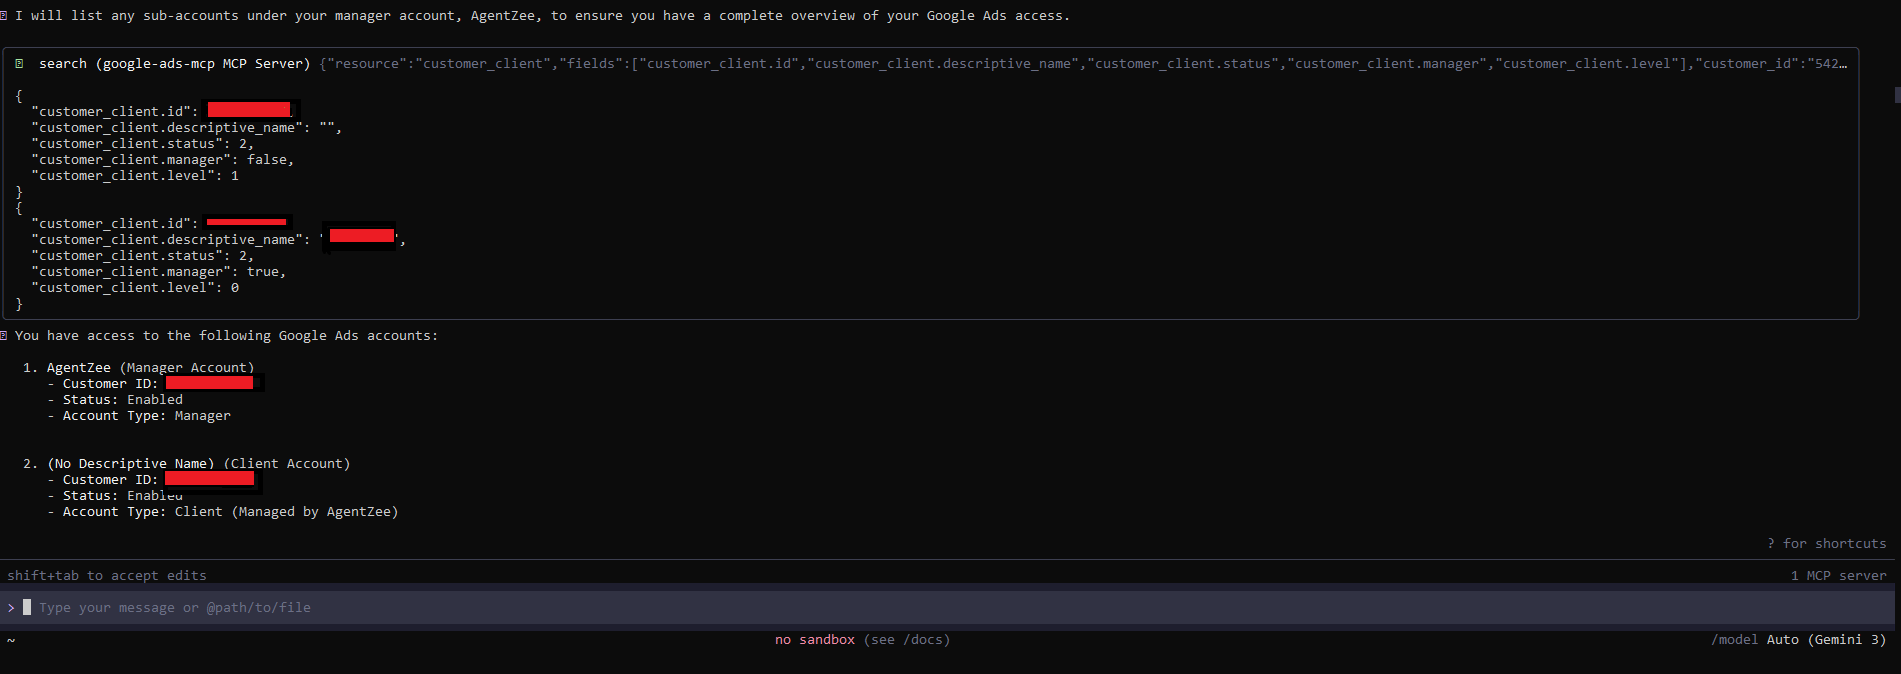
This is how you can perform Google Ads automation through the MCP server. This makes your daily work simple. No need to navigate or search metrics in the dashboard. Simply ask a question and get a relevant answer in plain text.
Make your Google Ads automation easier: Agentzee helps you
To make this Google Ads automation simple, you can check out our product Agentzee. Here, you don’t need to write code, install dependencies, or do anything. Just connect your Google Ads account through OAuth. You can get your Google Ads performance details just by asking a question. Just ask the question you want to know; it will automatically collect data from your account and form a report for your clear reference.
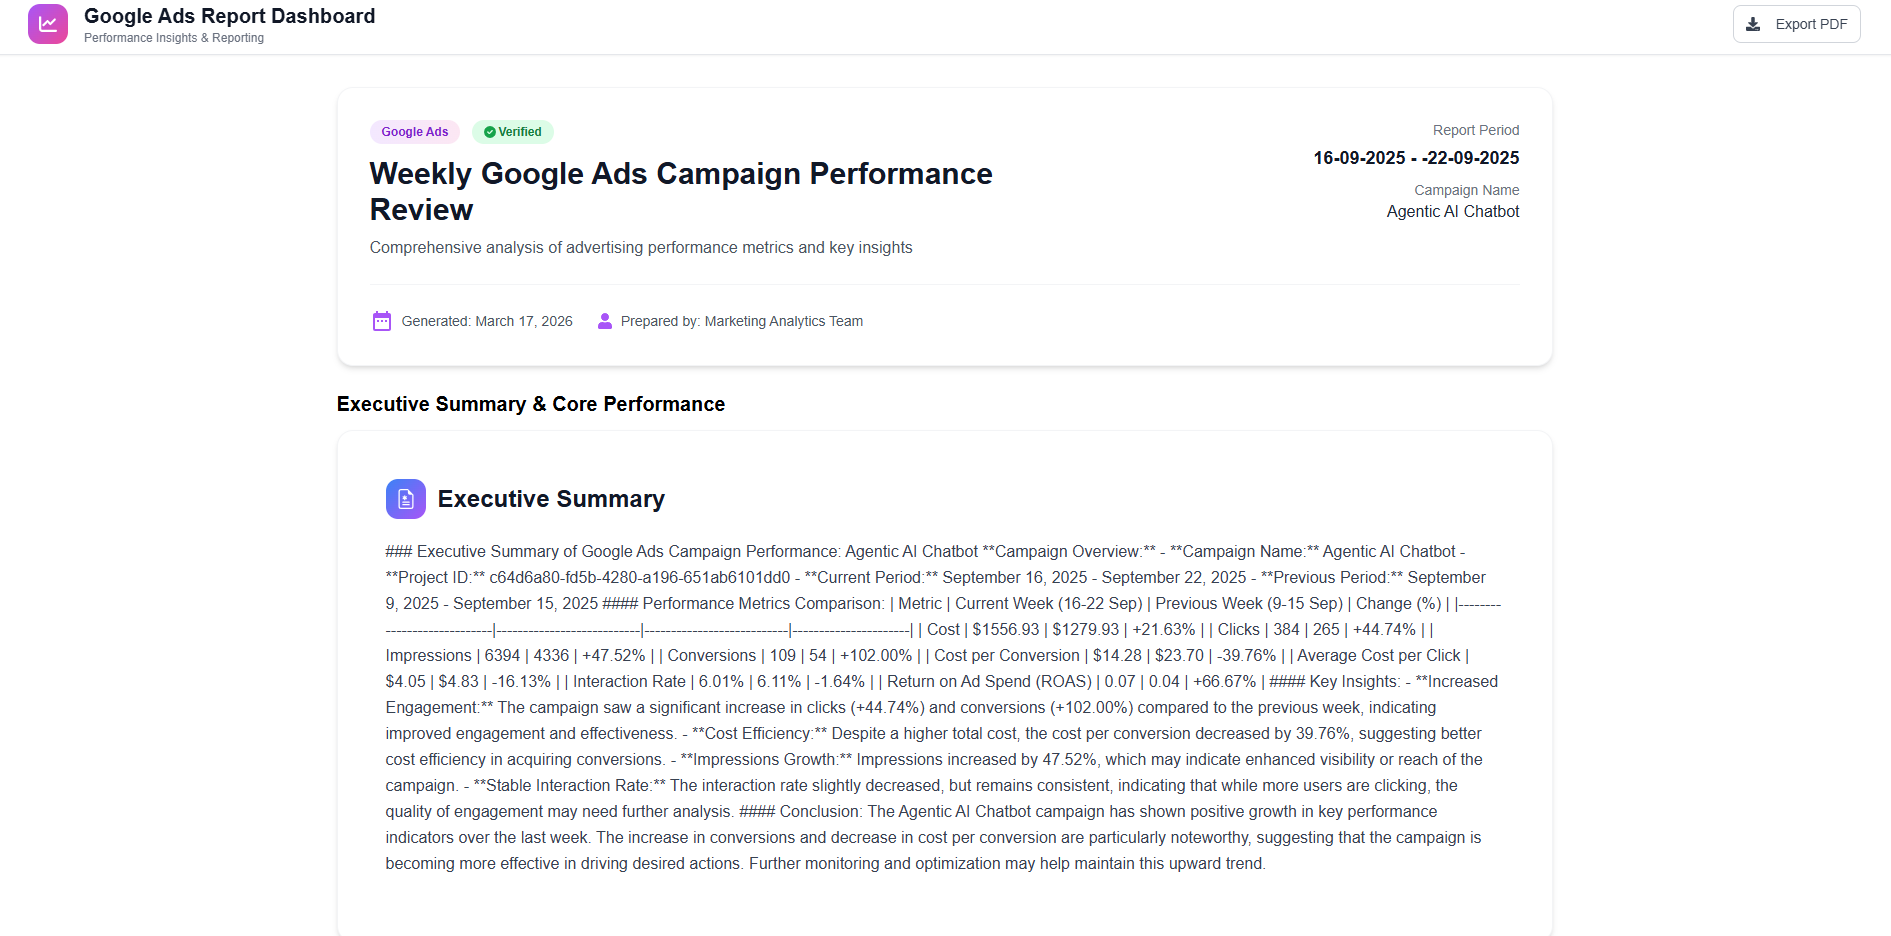
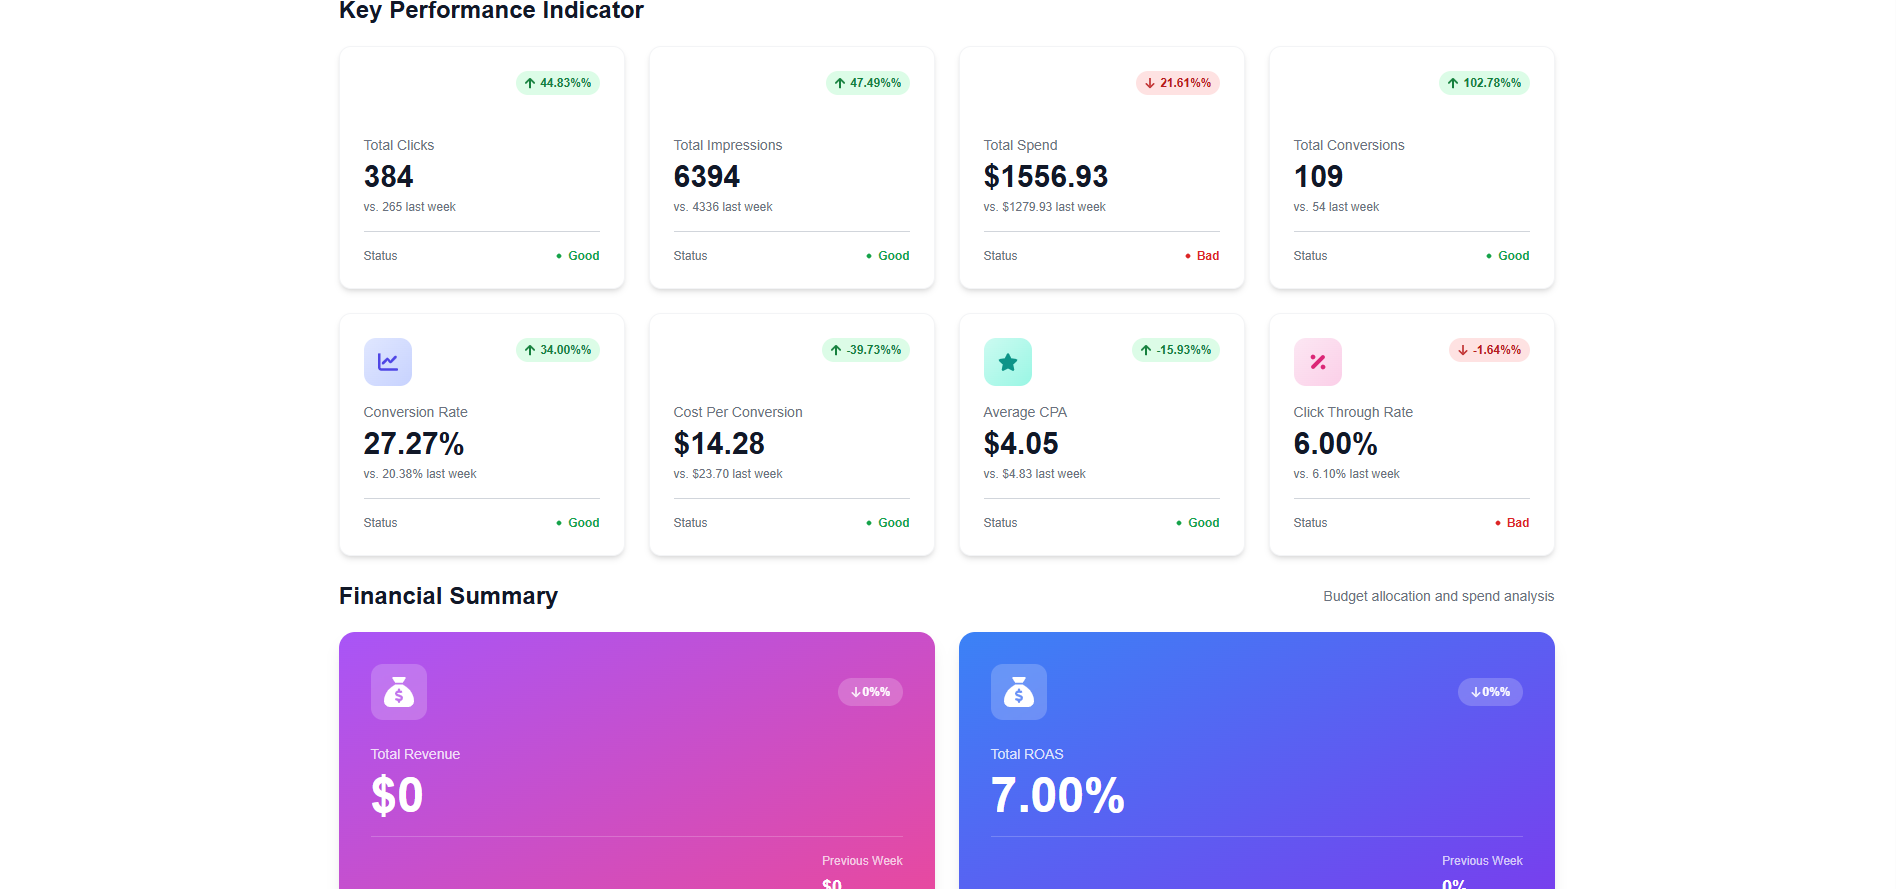
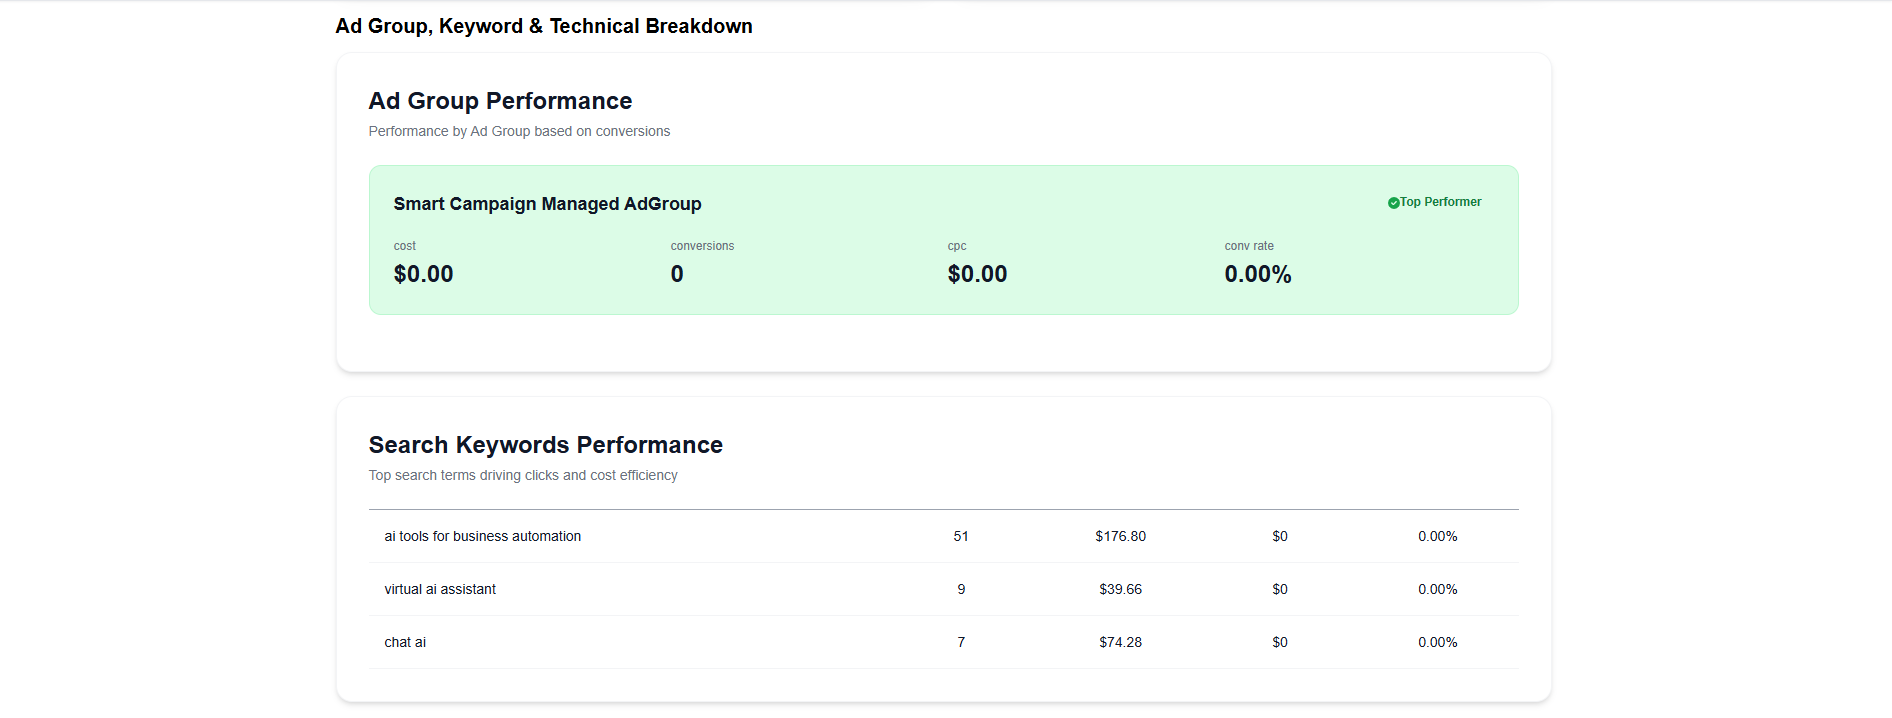
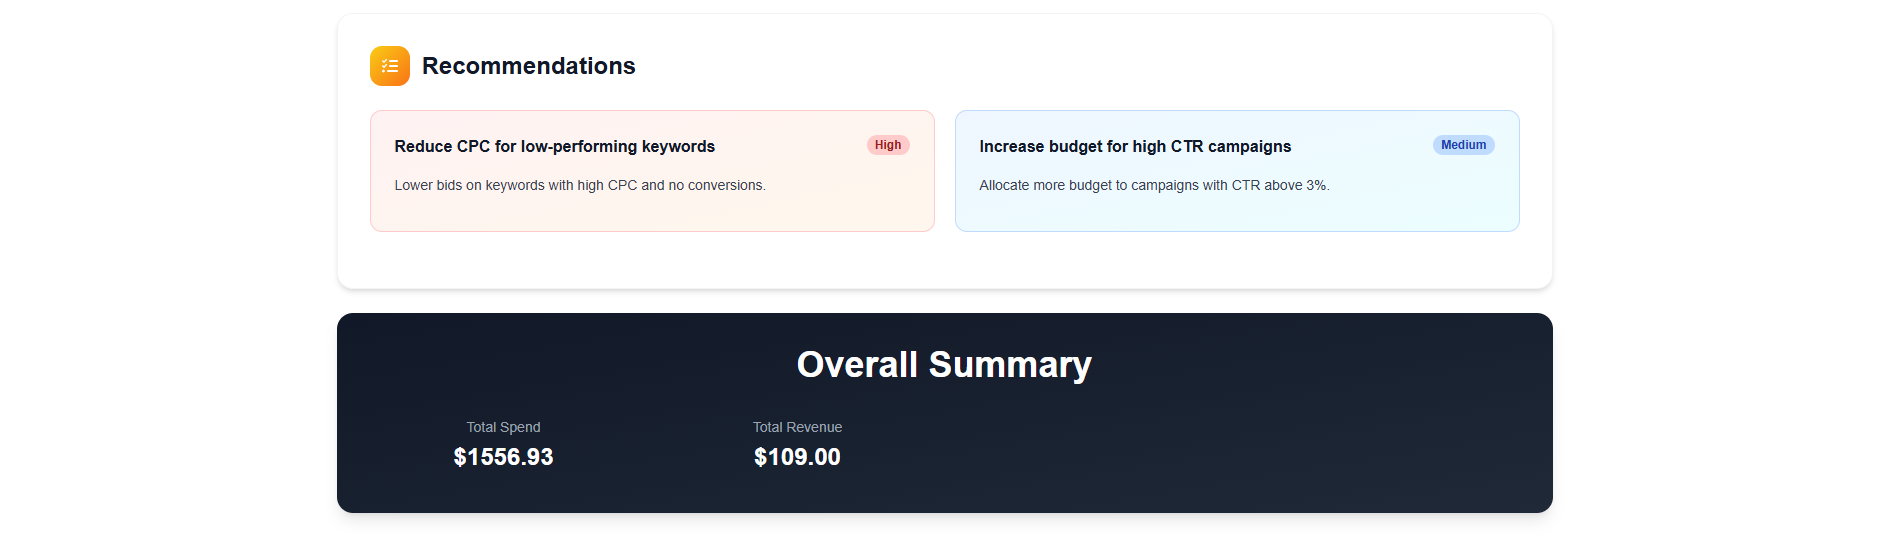
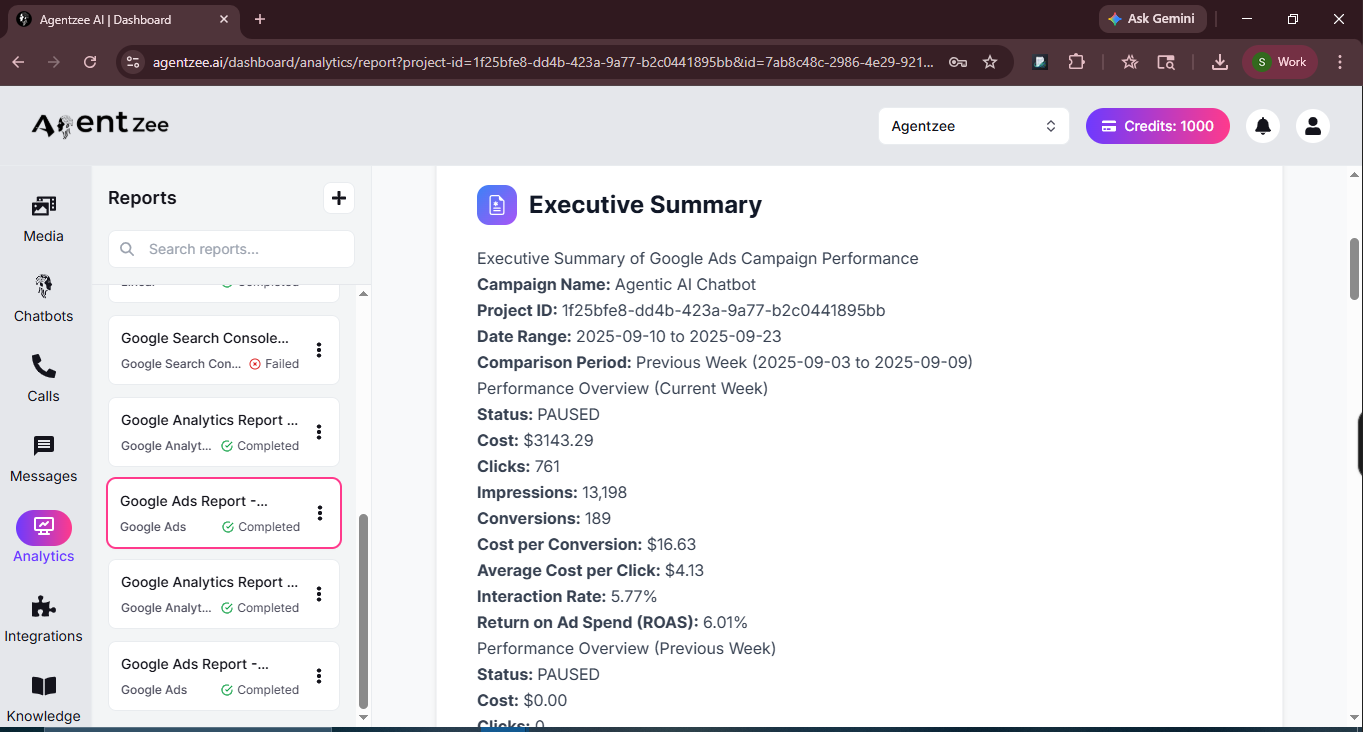
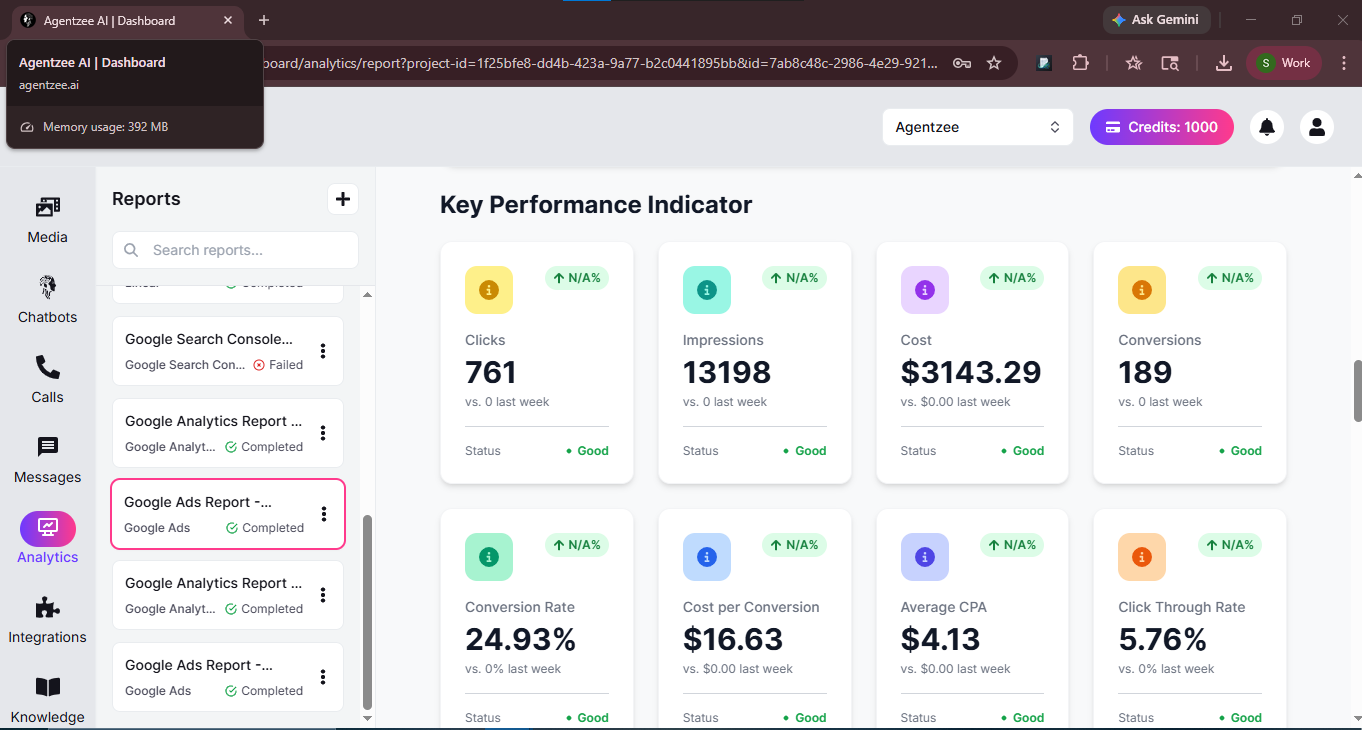
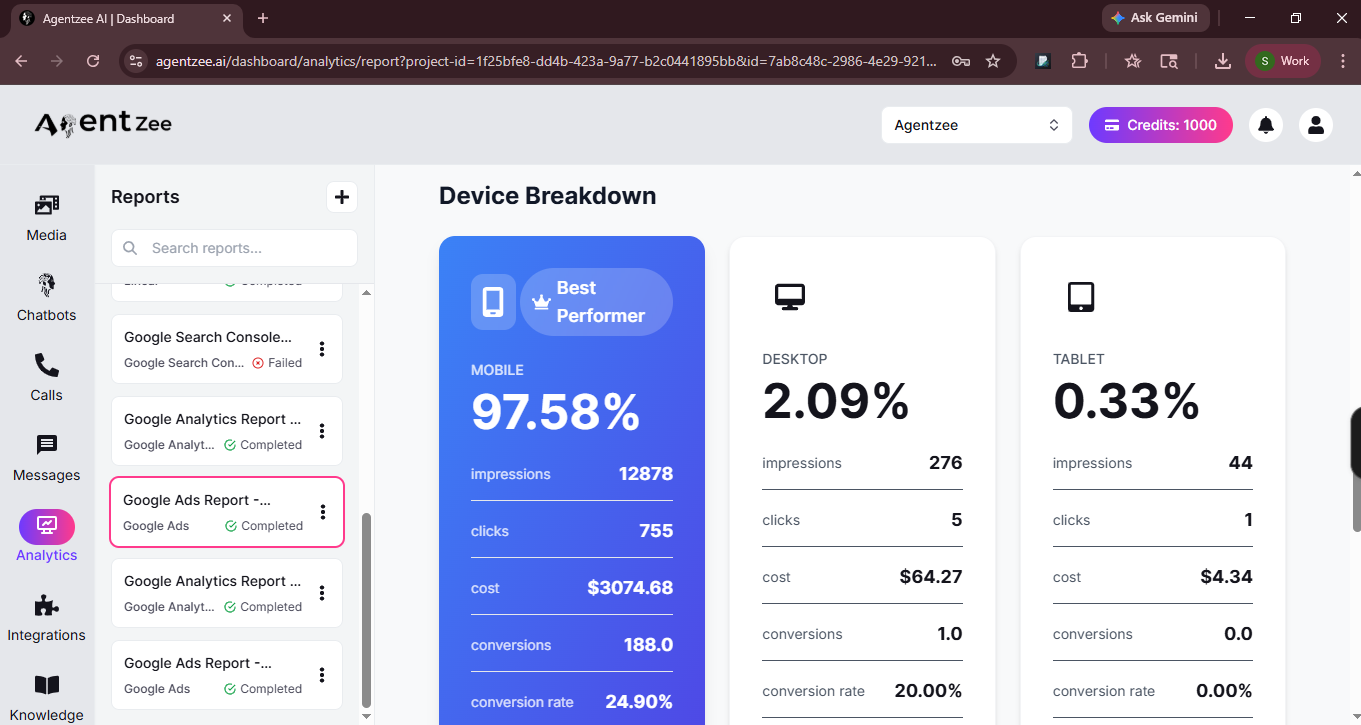
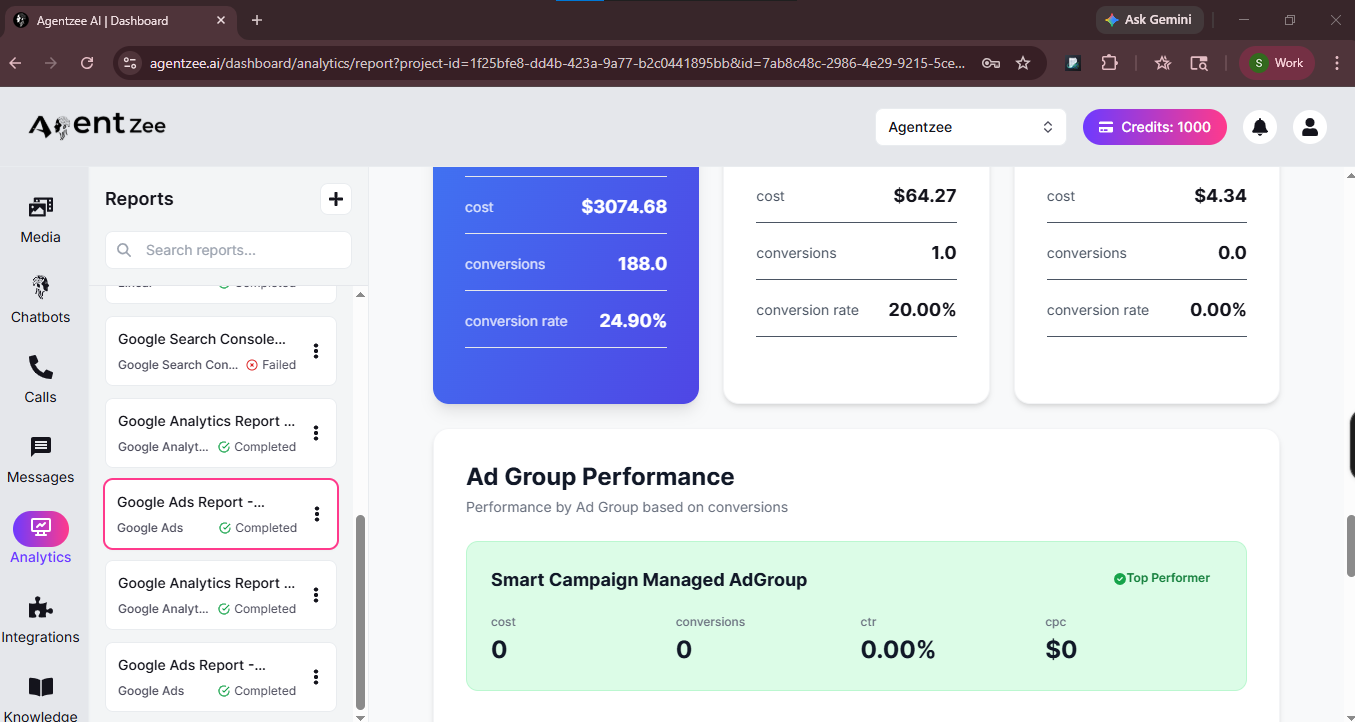
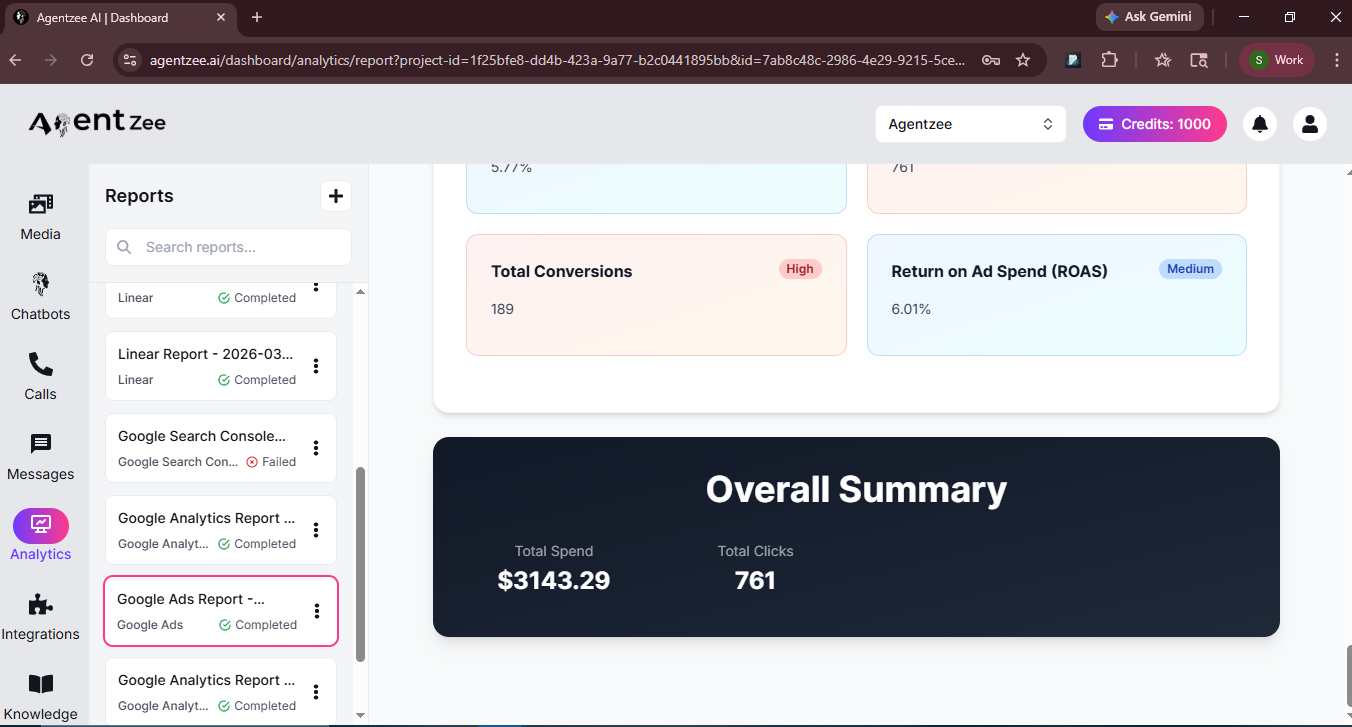
The complete report will look like this. If the user asks a question “Create a Google Ads weekly report and highlight wasted ad spend, low CTR campaigns, and keywords with high CPC but no conversions for my campaign Agentic AI Chatbot for the date range 2025-09-16 to 2025-09-22.”
Then the output report will look like this.
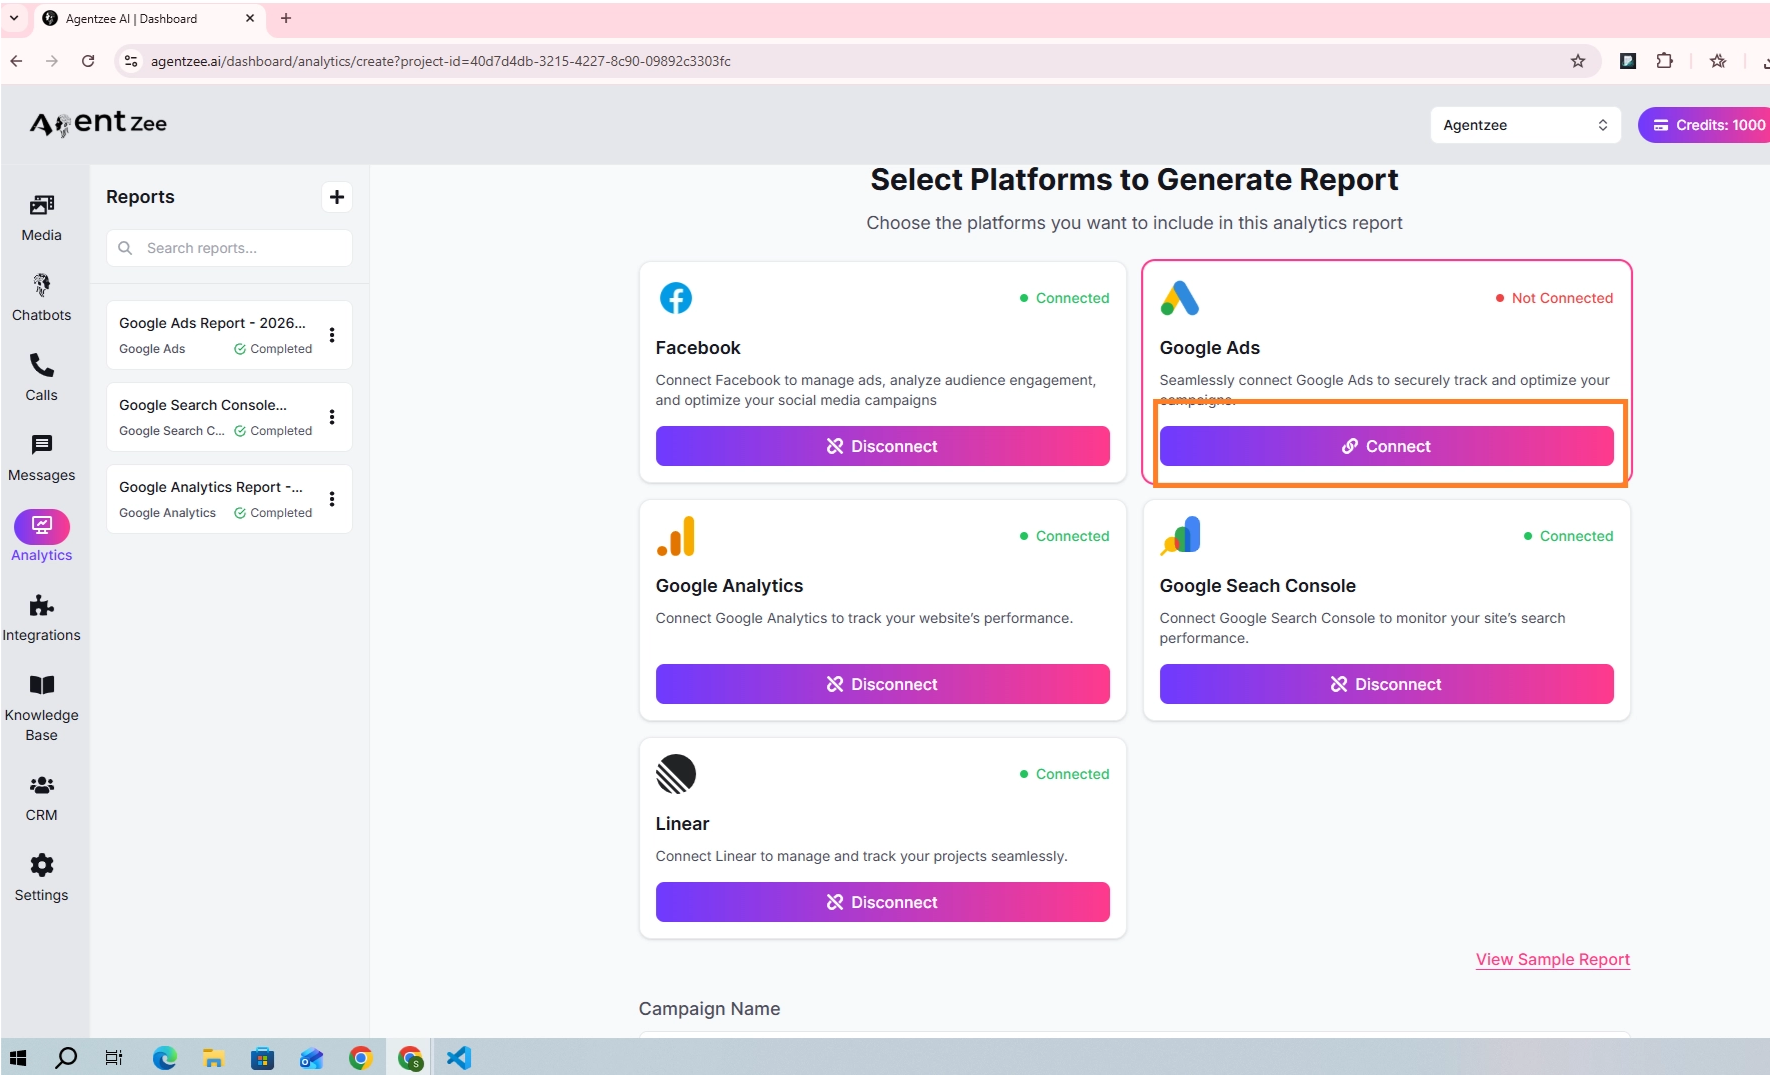
How to connect a Google Ads account for Google Ads automation in Agentzee
First, you need to sign up for Agentzee for the Google Ads automation for your Google Ads account. Then go to Agentzee analytics agent and then click ‘Connect.’
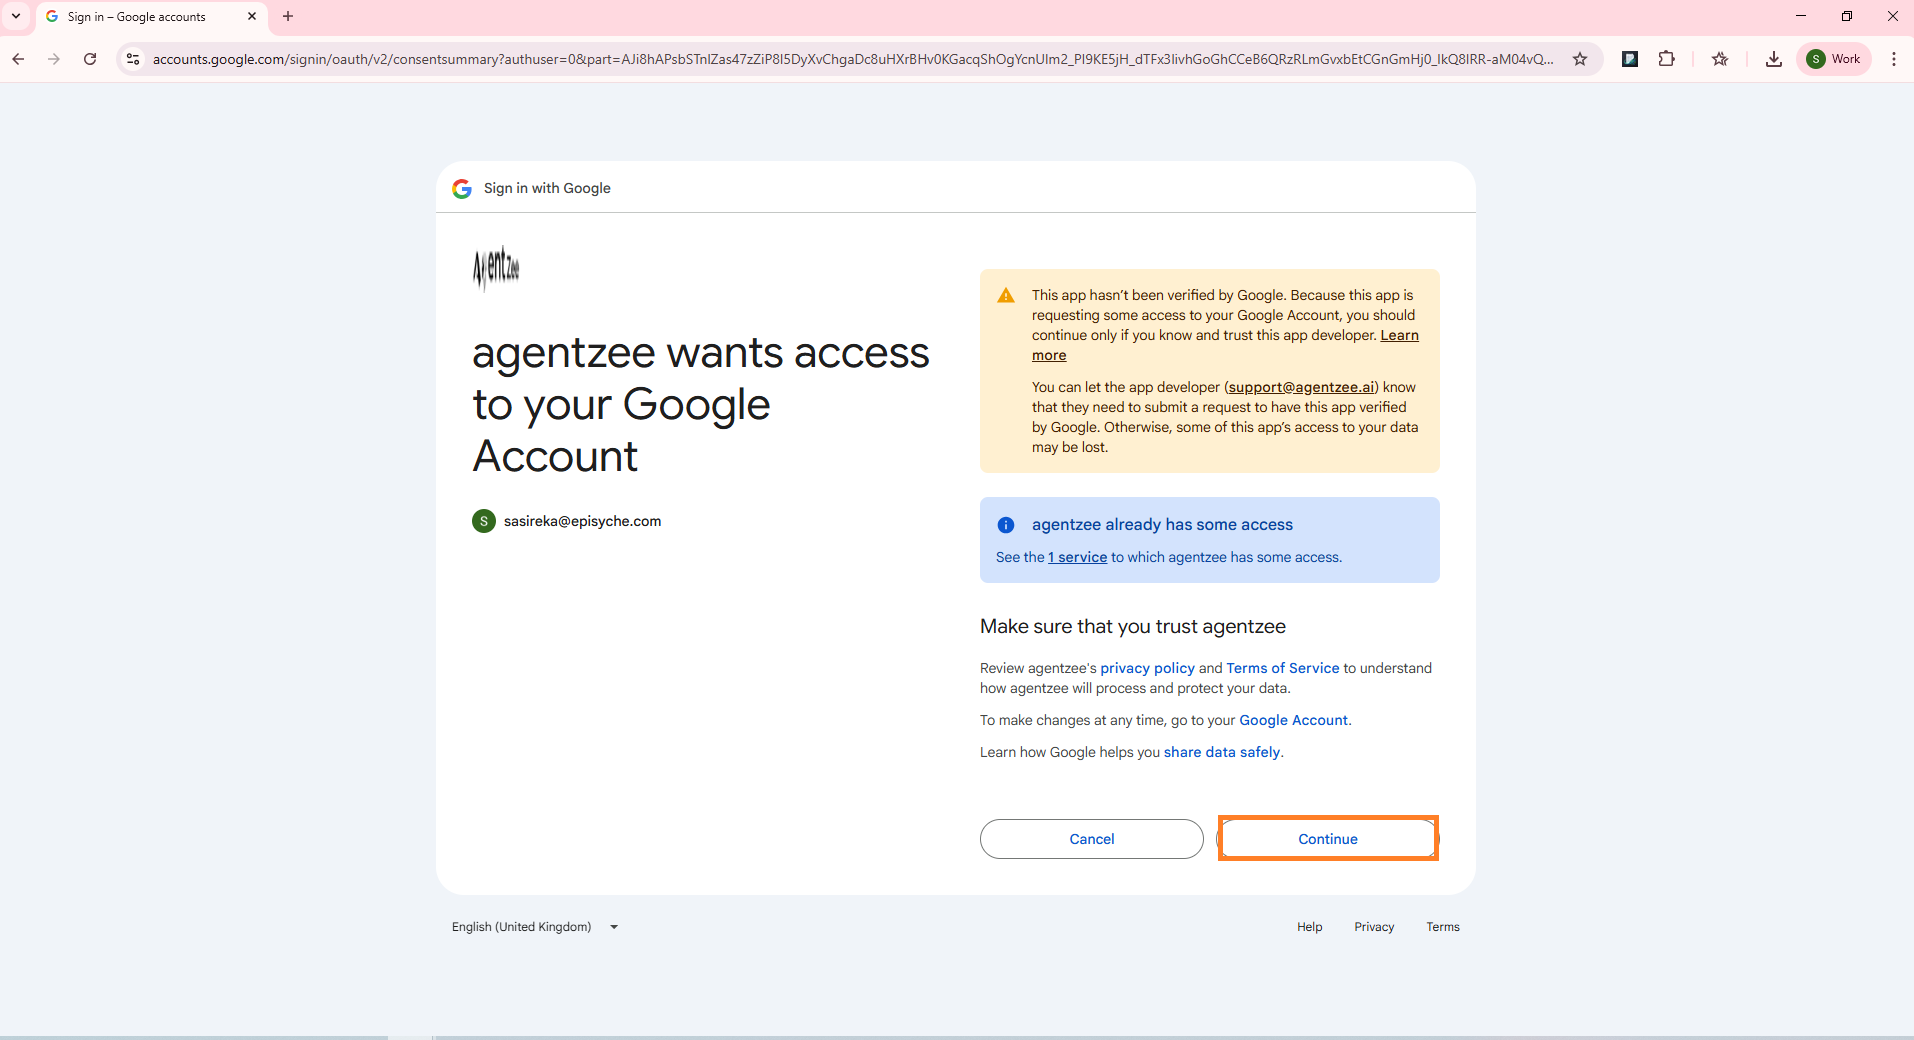
It will redirect you to the consent screen.
No need to create a cloud project on your own
No need to download credential files
No Google Cloud CLI and Gemini CLI
No Python packages
Just need to authorize our app. Click connect.
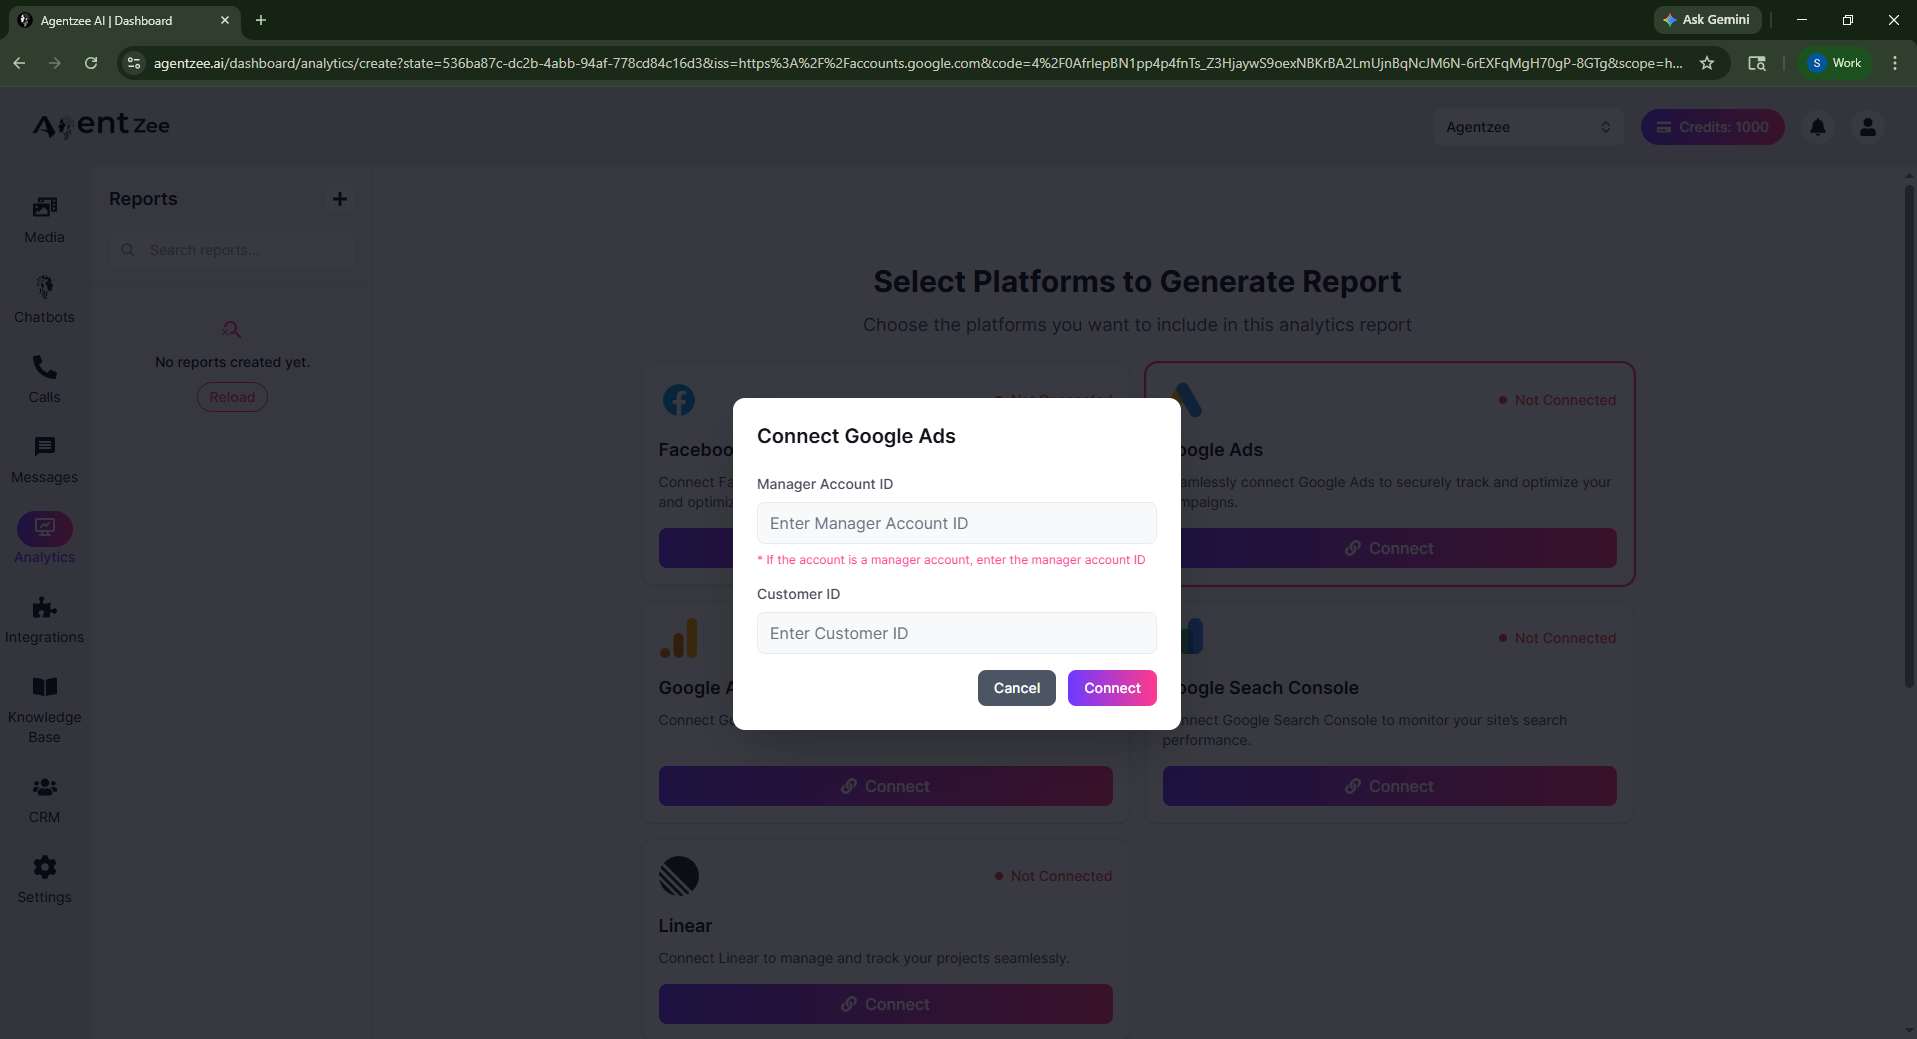
After this, it will ask for the manager’s account ID and the customer ID
If you have a manager account ID, then you should mention the customer account ID.
If you only have one customer ID (user account), then skip the manager account ID.
Then your account connects. By asking a question, you can generate a complete report. This Google Ads automation makes your work easier. It will be the time of searching and navigating in the dashboards. Just open Agentzee and ask your question to get the data.
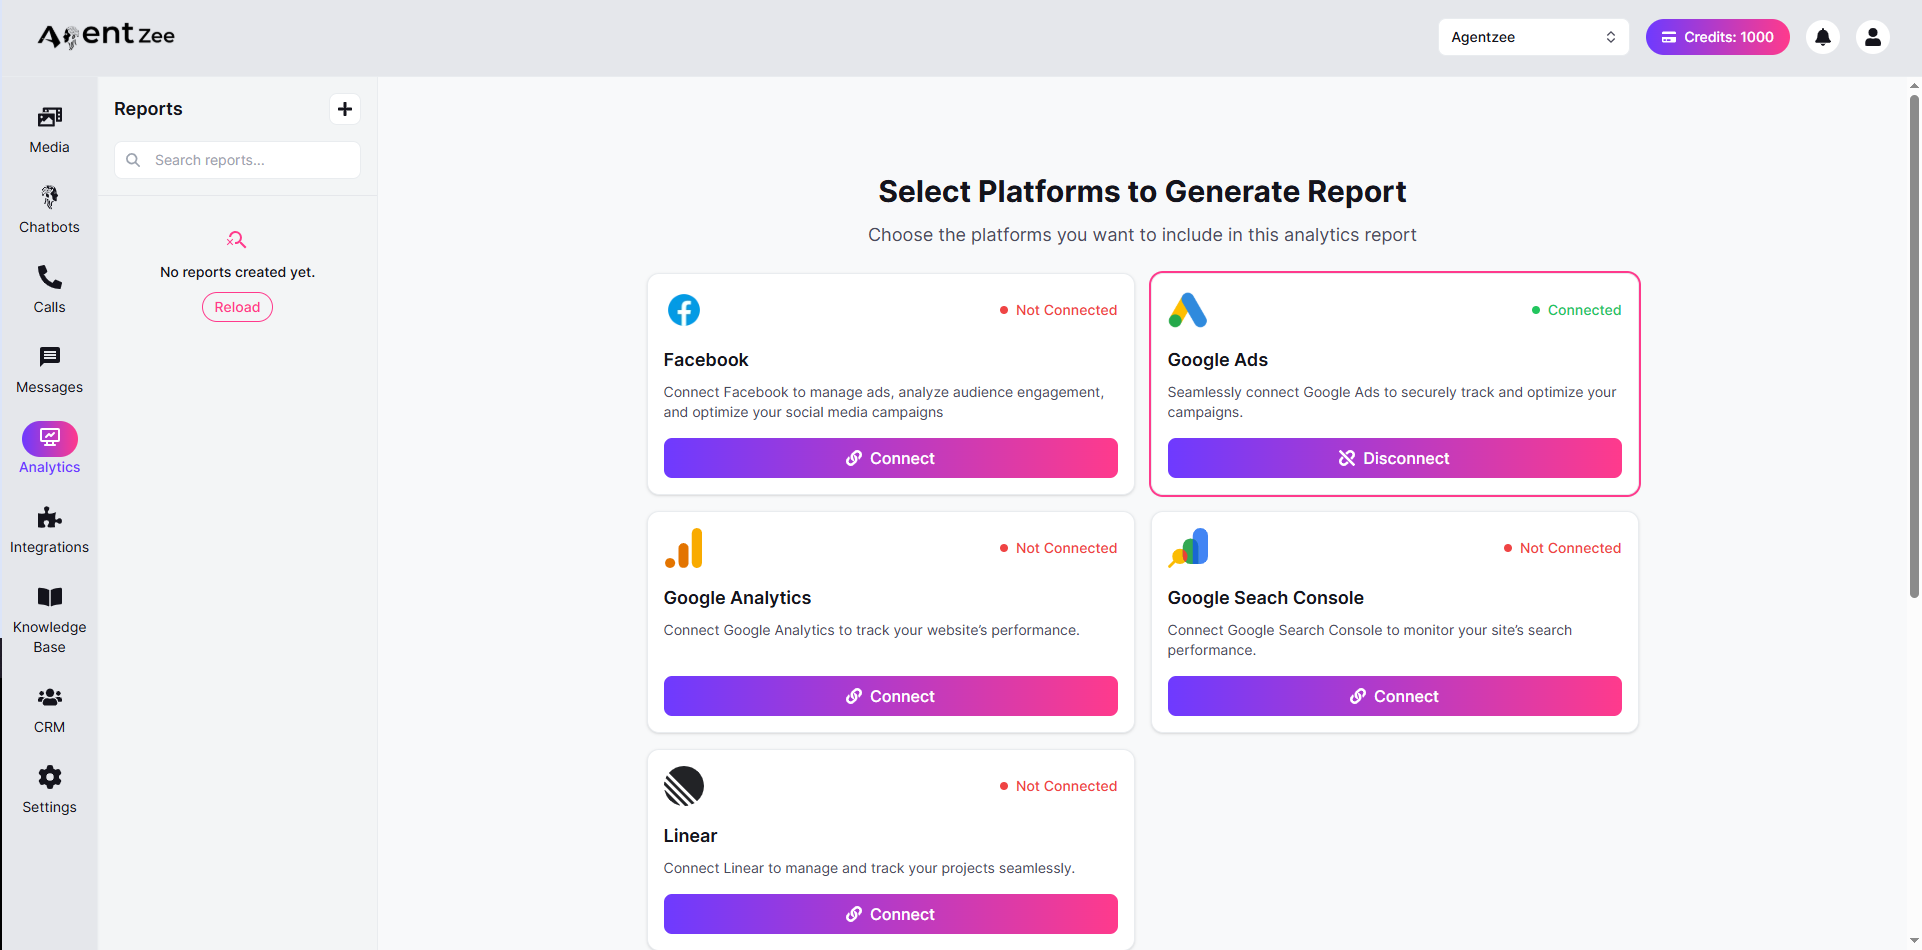
Then, click Google Ads, and it asks for some information to create a report. Just fill in those details correctly. If you entered your campaign name incorrectly, you can’t get data. And if you give a wrong date range in which the campaign is not running then also you can’t get data.
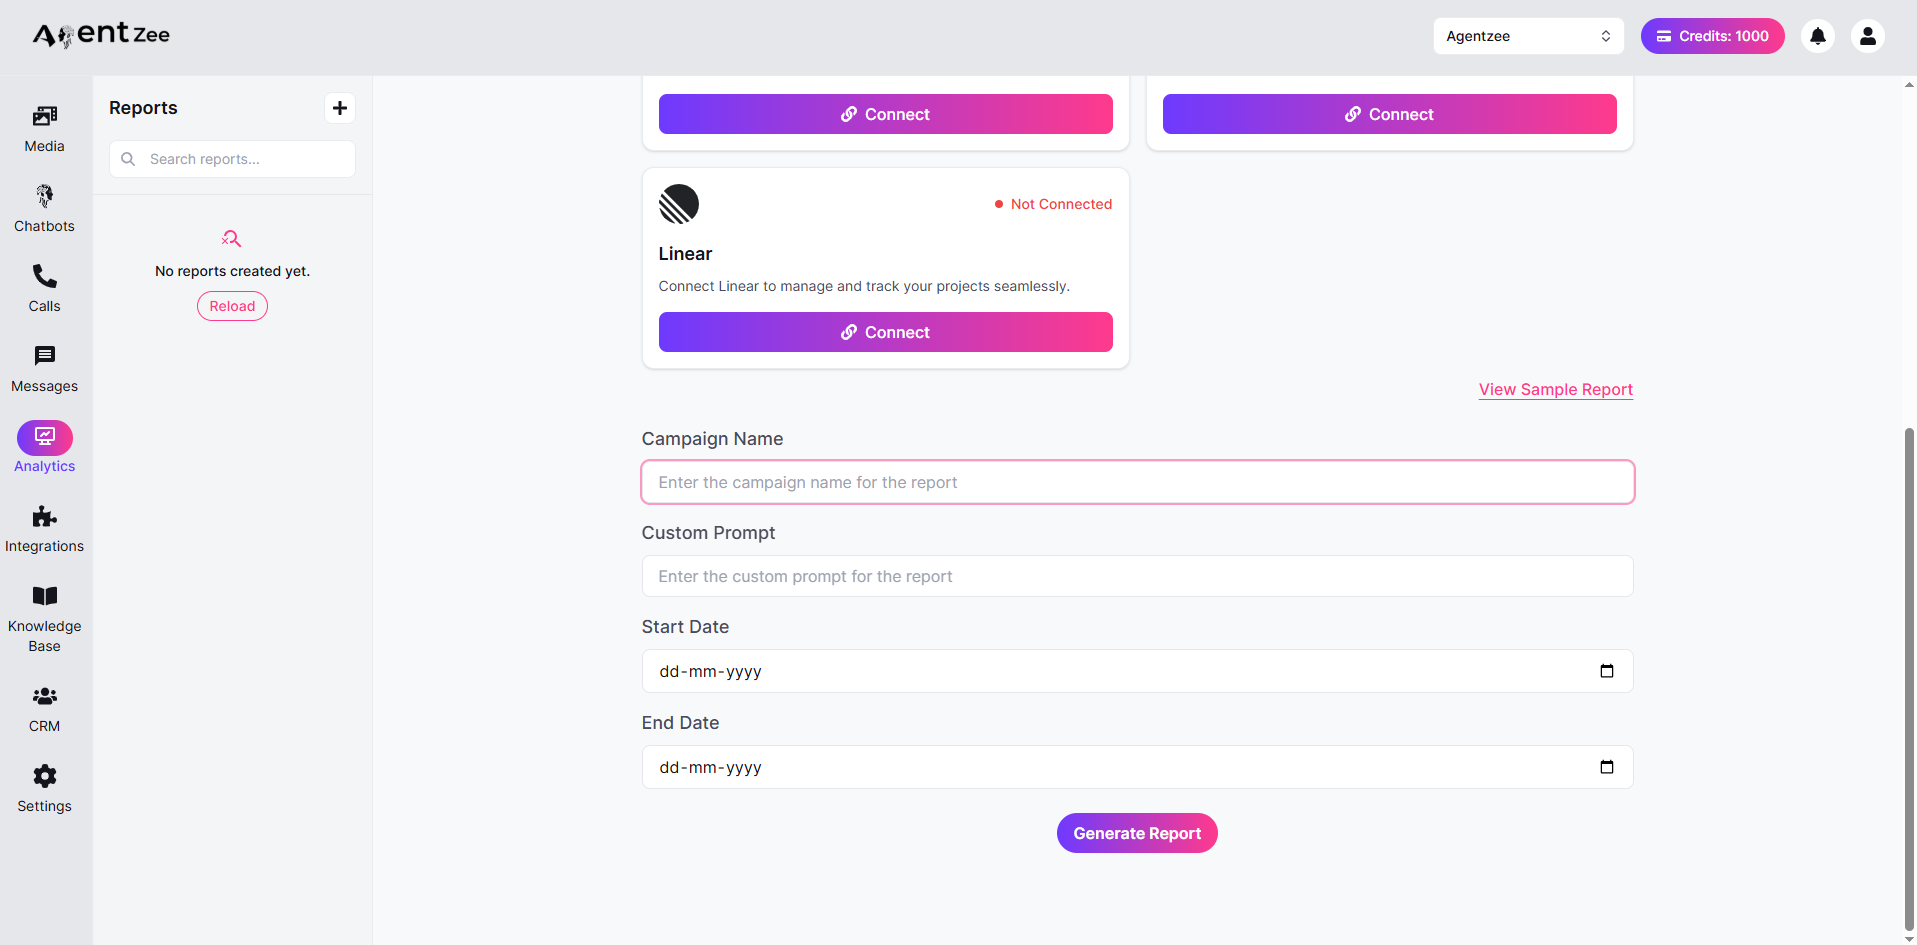
And then after a few minutes, you’ll get a complete report. You can add a custom prompt here, like “ Generate a complete Google Ads report with device information and geographical information,” or simply add “Generate a Google Ads report”. Our Google Ads automation system will generate a report for you.
Conclusion
Google Ads automation through the MCP server makes your work faster and easier. The initial time setup needs some time, but it will be long-lasting. If you ask, is this work for all accounts? Honestly no. Because large MCC accounts have multiple customer accounts. So the API quickly gets quota limits.
But with the single user account or MCC account with limited customer accounts, this automation works perfectly. Our goal is not to replace the analyst. The main goal is to reduce the time and automate everything. In this system, there is no middleware, no dashboard navigation, and no third-party access.
If you want to try it out fast, then Agentzee is here.
And you can use our product analytics agent on the Agentzee website